Search

Software Engineer's Notes

Tag

technology

Understanding OLTP Databases: A Complete Guide

Understanding OLTP Databases

What is an OLTP Database?

OLTP stands for Online Transaction Processing. It refers to a type of database system designed to handle large numbers of small, quick operations such as insertions, updates, and deletions. These operations are often transactional in nature—for example, making a bank transfer, booking a flight ticket, or purchasing an item online.

An OLTP database focuses on speed, concurrency, and reliability, ensuring that millions of users can perform operations simultaneously without data loss or corruption.

A Brief History of OLTP Databases

  • 1960s–1970s: Early database systems relied heavily on hierarchical and network models. Transaction processing was limited and often batch-oriented.
  • 1970s–1980s: With the invention of relational databases (thanks to Edgar F. Codd’s relational model), OLTP became more structured and efficient.
  • 1980s–1990s: As businesses expanded online, the demand for real-time transaction processing grew. Systems like IBM’s CICS (Customer Information Control System) became cornerstones of OLTP.
  • 2000s–Today: Modern OLTP databases (e.g., Oracle, MySQL, PostgreSQL, SQL Server) have evolved with features like replication, clustering, and distributed transaction management to support large-scale web and mobile applications.

Main Characteristics of OLTP Databases

  1. High Transaction Throughput
    • Capable of handling thousands to millions of operations per second.
    • Optimized for small, frequent read/write queries.
  2. Concurrency Control
    • Multiple users can access and modify data at the same time.
    • Uses mechanisms like locks, isolation levels, and ACID properties.
  3. Real-Time Processing
    • Transactions are executed instantly with immediate feedback to users.
  4. Data Integrity
    • Enforces strict ACID compliance (Atomicity, Consistency, Isolation, Durability).
    • Ensures data is reliable even in cases of system failures.
  5. Normalization
    • OLTP databases are usually highly normalized to reduce redundancy and maintain consistency.

Key Features of OLTP Databases

  • Fast Query Processing: Designed for quick response times.
  • Support for Concurrent Users: Handles thousands of simultaneous connections.
  • Transaction-Oriented: Focused on CRUD operations (Create, Read, Update, Delete).
  • Error Recovery: Rollback and recovery mechanisms guarantee system stability.
  • Security: Role-based access and encryption ensure secure data handling.

Main Components of OLTP Systems

  1. Database Engine
    • Executes queries, manages transactions, and enforces ACID properties.
    • Examples: MySQL InnoDB, PostgreSQL, Oracle Database.
  2. Transaction Manager
    • Monitors ongoing transactions, manages concurrency, and resolves conflicts.
  3. Locking & Concurrency Control System
    • Ensures that multiple users can work on data without conflicts.
  4. Backup and Recovery Systems
    • Protects against data loss and ensures durability.
  5. User Interfaces & APIs
    • Front-end applications that allow users and systems to perform transactions.

Benefits of OLTP Databases

  • High Performance: Handles thousands of transactions per second.
  • Reliability: ACID compliance ensures accuracy and stability.
  • Scalability: Supports large user bases and can scale horizontally with clustering and replication.
  • Data Integrity: Prevents data anomalies with strict consistency rules.
  • Real-Time Analytics: Provides up-to-date information for operational decisions.

When and How Should We Use OLTP Databases?

  • Use OLTP databases when:
    • You need to manage frequent, small transactions.
    • Real-time processing is essential.
    • Data consistency is critical (e.g., finance, healthcare, e-commerce).
  • How to use them effectively:
    • Choose a relational DBMS like PostgreSQL, Oracle, SQL Server, or MySQL.
    • Normalize schema design for data integrity.
    • Implement indexing to speed up queries.
    • Use replication and clustering for scalability.
    • Regularly monitor and optimize performance.

Real-World Examples of OLTP Databases

  1. Banking Systems: Handling deposits, withdrawals, and transfers in real time.
  2. E-commerce Platforms: Managing product purchases, payments, and shipping.
  3. Airline Reservation Systems: Booking flights, updating seat availability instantly.
  4. Healthcare Systems: Recording patient check-ins, lab results, and prescriptions.
  5. Retail Point-of-Sale (POS) Systems: Processing sales transactions quickly.

Integrating OLTP Databases into Software Development

  • Step 1: Requirement Analysis
    • Identify transaction-heavy components in your application.
  • Step 2: Schema Design
    • Use normalized schemas to ensure consistency.
  • Step 3: Choose the Right Database
    • For mission-critical systems: Oracle or SQL Server.
    • For scalable web apps: PostgreSQL or MySQL.
  • Step 4: Implement Best Practices
    • Use connection pooling, indexing, and query optimization.
  • Step 5: Ensure Reliability
    • Set up backups, replication, and monitoring systems.
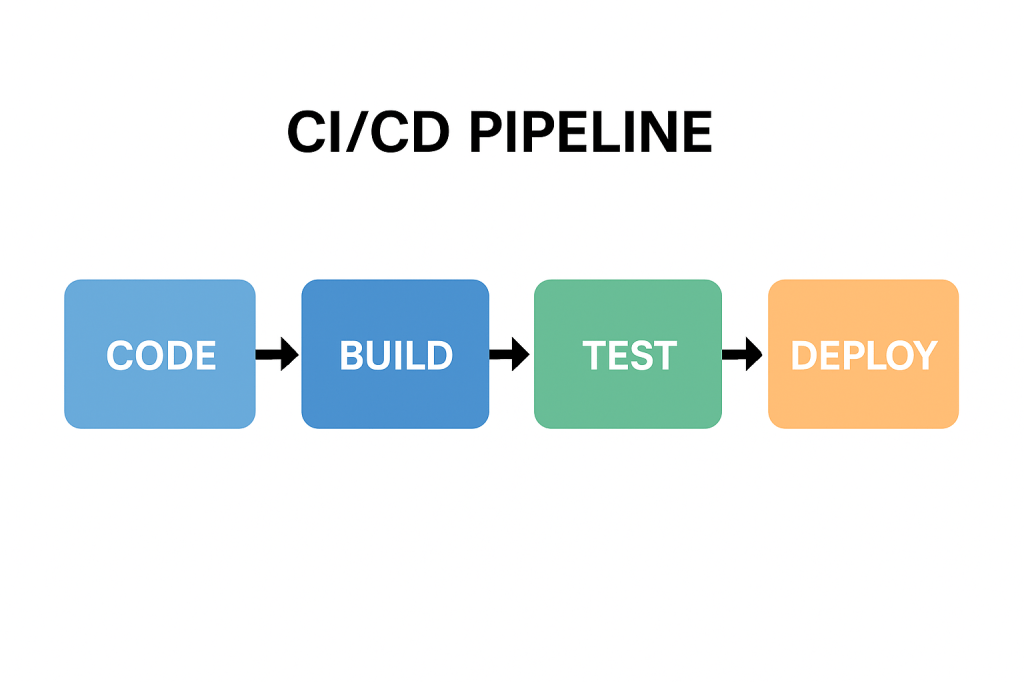
  • Step 6: Continuous Integration
    • Include database migrations and schema validations in your CI/CD pipeline.

Conclusion

OLTP databases are the backbone of modern transaction-driven systems. Their speed, reliability, and ability to support high volumes of concurrent users make them indispensable in industries like finance, healthcare, retail, and travel.

By understanding their history, characteristics, and integration methods, software engineers can effectively design systems that are both scalable and reliable.

State Management in Software Engineering

Learning state management

What Is State Management?

State is the “memory” of a system—the data that captures what has happened so far and what things look like right now.
State management is the set of techniques you use to represent, read, update, persist, share, and synchronize that data across components, services, devices, and time.

Examples of state:

  • A user’s shopping cart
  • The current screen and filters in a UI
  • A microservice’s cache
  • A workflow’s step (“Pending → Approved → Shipped”)
  • A distributed ledger’s account balances

Why Do We Need It?

  • Correctness: Make sure reads/writes follow rules (e.g., no negative inventory).
  • Predictability: Same inputs produce the same outputs; fewer “heisenbugs.”
  • Performance: Cache and memoize expensive work.
  • Scalability: Share and replicate state safely across processes/regions.
  • Resilience: Recover after crashes with snapshots, logs, or replicas.
  • Collaboration: Keep many users and services in sync (conflict handling included).
  • Auditability & Compliance: Track how/when state changed (who did what).

How Can We Achieve It? (Core Approaches)

  1. Local/In-Memory State
    • Kept inside a process (e.g., component state in a UI, service memory cache).
    • Fast, simple; volatile and not shared by default.
  2. Centralized Store
    • A single source of truth (e.g., Redux store, Vuex/Pinia, NgRx).
    • Deterministic updates via actions/reducers; great for complex UIs.
  3. Server-Side Persistence
    • Databases (SQL/NoSQL), key-value stores (Redis), object storage.
    • ACID/transactions for strong consistency; or tunable/BASE for scale.
  4. Event-Driven & Logs
    • Append-only logs (Kafka, Pulsar), pub/sub, event sourcing.
    • Rebuild state from events; great for audit trails and temporal queries.
  5. Finite State Machines/Statecharts
    • Explicit states and transitions (e.g., XState).
    • Eliminates impossible states; ideal for workflows and UI flows.
  6. Actor Model
    • Isolated “actors” own their state and communicate via messages (Akka, Orleans).
    • Avoids shared memory concurrency issues.
  7. Sagas/Process Managers
    • Coordinate multi-service transactions with compensating actions.
    • Essential for long-running, distributed workflows.
  8. Caching & Memoization
    • In-memory, Redis, CDN edge caches; read-through/write-through patterns.
  9. Synchronization & Consensus
    • Leader election and config/state coordination (Raft/etcd, Zookeeper).
    • Used for distributed locks, service discovery, cluster metadata.
  10. Conflict-Friendly Models
    • CRDTs and operational transforms for offline-first and collaborative editing.

Patterns & When To Use Them

  • Repository Pattern: Encapsulate persistence logic behind an interface.
  • Unit of Work: Group changes into atomic commits (helpful with ORMs).
  • CQRS: Separate reads and writes for scale/optimization.
  • Event Sourcing: Store the events; derive current state on demand.
  • Domain-Driven Design (DDD) Aggregates: Keep invariants inside boundaries.
  • Idempotent Commands: Safe retries in distributed environments.
  • Outbox Pattern: Guarantee DB + message bus consistency.
  • Cache-Aside / Read-Through: Balance performance and freshness.
  • Statechart-Driven UIs: Model UI states explicitly to avoid edge cases.

Benefits of Good State Management

  • Fewer bugs & clearer mental model (explicit transitions and invariants)
  • Traceability (who changed what, when, and why)
  • Performance (targeted caching, denormalized read models)
  • Flexibility (swap persistence layers, add features without rewrites)
  • Scalability (independent read/write scaling, sharding)
  • Resilience (snapshots, replays, blue/green rollouts)

Real-World Use Cases

  • E-commerce: Cart, inventory reservations, orders (Sagas + Outbox + CQRS).
  • Banking/FinTech: Double-entry ledgers, idempotent transfers, audit trails (Event Sourcing).
  • Healthcare: Patient workflow states, consent, auditability (Statecharts + DDD aggregates).
  • IoT: Device twins, last-known telemetry, conflict resolution (CRDTs or eventual consistency).
  • Collaboration Apps: Docs/whiteboards with offline editing (CRDTs/OT).
  • Gaming/Realtime: Matchmaking and player sessions (Actor model + in-memory caches).
  • Analytics/ML: Feature stores and slowly changing dimensions (immutable logs + batch/stream views).

Choosing an Approach (Quick Guide)

  • Simple UI component: Local state → lift to a small store if many siblings need it.
  • Complex UI interactions: Statecharts or Redux-style store with middleware.
  • High read throughput: CQRS with optimized read models + cache.
  • Strong auditability: Event sourcing + snapshots + projections.
  • Cross-service transactions: Sagas with idempotent commands + Outbox.
  • Offline/collaborative: CRDTs or OT, background sync, conflict-free merges.
  • Low-latency hot data: In-memory/Redis cache + cache-aside.

How To Use It In Your Software Projects

1) Model the Domain and State

  • Identify entities, value objects, and aggregates.
  • Write down invariants (“inventory ≥ 0”) and state transitions as a state diagram.

2) Define Read vs Write Paths

  • Consider CQRS if reads dominate or need different shapes than writes.
  • Create projections or denormalized views for common queries.

3) Pick Storage & Topology

  • OLTP DB for strong consistency; document/column stores for flexible reads.
  • Redis/memory caches for latency; message bus (Kafka) for event pipelines.
  • Choose consistency model (strong vs eventual) per use case.

4) Orchestrate Changes

  • Commands → validation → domain logic → events → projections.
  • For cross-service flows, implement Sagas with compensations.
  • Ensure idempotency (dedupe keys, conditional updates).

5) Make Failures First-Class

  • Retries with backoff, circuit breakers, timeouts.
  • Outbox for DB-to-bus consistency; dead-letter queues.
  • Snapshots + event replay for recovery.

6) Testing Strategy

  • Unit tests: Reducers/state machines (no I/O).
  • Property-based tests: Invariants always hold.
  • Contract tests: Between services for event/command schemas.
  • Replay tests: Rebuild from events and assert final state.

7) Observability & Ops

  • Emit domain events and metrics on state transitions.
  • Trace IDs through commands, handlers, and projections.
  • Dashboards for lag, cache hit rate, saga success/fail ratios.

8) Security & Compliance

  • AuthN/AuthZ checks at state boundaries.
  • PII encryption, data retention, and audit logging.

Practical Examples

Example A: Shopping Cart (Service + Cache + Events)

  • Write path: AddItemCommand validates stock → updates DB (aggregate) → emits ItemAdded.
  • Read path: Cart view uses a projection kept fresh via events; Redis caches the view.
  • Resilience: Outbox ensures ItemAdded is published even if the service restarts.

Example B: UI Wizard With Statecharts

  • States: Start → PersonalInfo → Shipping → Payment → Review → Complete
  • Guards prevent illegal transitions (e.g., can’t pay before shipping info).
  • Tests assert allowed transitions and side-effects per state.

Example C: Ledger With Event Sourcing

  • Only store TransferInitiated, Debited, Credited, TransferCompleted/Failed.
  • Current balances are projections; rebuilding is deterministic and auditable.

Common Pitfalls (and Fixes)

  • Implicit state in many places: Centralize or document owners; use a store.
  • Mutable shared objects: Prefer immutability; copy-on-write.
  • Missing idempotency: Add request IDs, conditional updates, and dedupe.
  • Tight coupling to DB schema: Use repositories and domain models.
  • Ghost states in UI: Use statecharts or a single source of truth.
  • Cache incoherence: Establish clear cache-aside/invalidations; track TTLs.

Lightweight Checklist

  • Enumerate state, owners, and lifecycle.
  • Decide consistency model per boundary.
  • Choose patterns (CQRS, Sagas, ES, Statecharts) intentionally.
  • Plan storage (DB/log/cache) and schemas/events.
  • Add idempotency and the Outbox pattern where needed.
  • Write reducer/state machine/unit tests.
  • Instrument transitions (metrics, logs, traces).
  • Document invariants and recovery procedures.

Final Thoughts

State management is not one tool—it’s a discipline. Start with your domain’s invariants and consistency needs, then choose patterns and storage that make those invariants easy to uphold. Keep state explicit, observable, and testable. Your systems—and your future self—will thank you.

What is a Modular Monolith?

What is a Modular Monolith?

A modular monolith is a software architecture style where an application is built as a single deployable unit (like a traditional monolith), but internally it is organized into well-defined modules. Each module encapsulates specific functionality and communicates with other modules through well-defined interfaces, making the system more maintainable and scalable compared to a classic monolith.

Unlike microservices, where each service is deployed and managed separately, modular monoliths keep deployment simple but enforce modularity within the application.

Main Components and Features of a Modular Monolith

1. Modules

  • Self-contained units with a clear boundary.
  • Each module has its own data structures, business logic, and service layer.
  • Modules communicate through interfaces, not direct database or code access.

2. Shared Kernel or Core

  • Common functionality (like authentication, logging, error handling) that multiple modules use.
  • Helps avoid duplication but must be carefully managed to prevent tight coupling.

3. Interfaces and Contracts

  • Communication between modules is strictly through well-defined APIs or contracts.
  • Prevents “spaghetti code” where modules become tangled.

4. Independent Development and Testing

  • Modules can be developed, tested, and even versioned separately.
  • Still compiled and deployed together, but modularity speeds up development cycles.

5. Single Deployment Unit

  • Unlike microservices, deployment remains simple (a single application package).
  • Easier to manage operationally while still benefiting from modularity.

Benefits of a Modular Monolith

1. Improved Maintainability

  • Clear separation of concerns makes the codebase easier to navigate and modify.
  • Developers can work within modules without breaking unrelated parts.

2. Easier Transition to Microservices

  • A modular monolith can serve as a stepping stone toward microservices.
  • Well-designed modules can later be extracted into independent services.

3. Reduced Complexity in Deployment

  • Single deployment unit avoids the operational complexity of managing multiple microservices.
  • No need to handle distributed systems challenges like service discovery or network latency.

4. Better Scalability Than a Classic Monolith

  • Teams can scale development efforts by working on separate modules independently.
  • Logical boundaries support parallel development.

5. Faster Onboarding

  • New developers can focus on one module at a time instead of the entire system.

Advantages and Disadvantages

Advantages

  • Simpler deployment compared to microservices.
  • Strong modular boundaries improve maintainability.
  • Lower infrastructure costs since everything runs in one unit.
  • Clear path to microservices if needed in the future.

Disadvantages

  • Scaling limits: the whole application still scales as one unit.
  • Tight coupling risk: if boundaries are not enforced, modules can become tangled.
  • Database challenges: teams must resist the temptation of a single shared database without proper separation.
  • Not as resilient: a failure in one module can still crash the entire system.

Real-World Use Cases and Examples

  1. E-commerce Platforms
    • Modules like “Product Catalog,” “Shopping Cart,” “Payments,” and “User Management” are separate but deployed together.
  2. Banking Systems
    • Modules for “Accounts,” “Transactions,” “Loans,” and “Reporting” allow different teams to work independently.
  3. Healthcare Applications
    • Modules like “Patient Records,” “Appointments,” “Billing,” and “Analytics” benefit from modular monolith design before moving to microservices.
  4. Enterprise Resource Planning (ERP)
    • HR, Finance, and Inventory modules can live in a single deployment but still be logically separated.

How to Integrate Modular Monolith into Your Software Development Process

  1. Define Clear Module Boundaries
    • Start by identifying core domains and subdomains (Domain-Driven Design can help).
  2. Establish Communication Rules
    • Only allow interaction through interfaces or APIs, not direct database or code references.
  3. Use Layered Architecture Within Modules
    • Separate each module into layers: presentation, application logic, and domain logic.
  4. Implement Independent Testing for Modules
    • Write unit and integration tests per module.
  5. Adopt Incremental Refactoring
    • If you have a classic monolith, refactor gradually into modules.
  6. Prepare for Future Growth
    • Design modules so they can be extracted as microservices when scaling demands it.

Conclusion

A modular monolith strikes a balance between the simplicity of a traditional monolith and the flexibility of microservices. By creating strong modular boundaries, teams can achieve better maintainability, parallel development, and scalability while avoiding the operational overhead of distributed systems.

It’s a great fit for teams who want to start simple but keep the door open for future microservices adoption.

Understanding Model-View-ViewModel (MVVM)

Understanding Model-View-ViewModel

What is MVVM?

What is MVVM?

Model-View-ViewModel (MVVM) is a software architectural pattern that helps organize code by separating the user interface (UI) from the business logic. It acts as an evolution of the Model-View-Controller (MVC) pattern, designed to make applications more testable, maintainable, and scalable. MVVM is particularly popular in applications with complex user interfaces, such as desktop and mobile apps.

A Brief History

MVVM was introduced by Microsoft around 2005 as part of the development of Windows Presentation Foundation (WPF). The goal was to provide a clean separation between the UI and underlying application logic, making it easier for designers and developers to collaborate. Over time, the pattern has spread beyond WPF and is now used in many frameworks and platforms, including Xamarin, Angular, and even some JavaScript libraries.

Main Components of MVVM

MVVM is built on three main components:

Model

  • Represents the data and business logic of the application.
  • Responsible for managing the application state, retrieving data from databases or APIs, and applying business rules.
  • Example: A Customer class containing fields like Name, Email, and methods for validation.

View

  • Represents the user interface.
  • Displays the data and interacts with the user.
  • Ideally, the view should contain minimal logic and be as declarative as possible.
  • Example: A screen layout in WPF, Android XML, or an HTML template.

ViewModel

  • Acts as a bridge between the Model and the View.
  • Handles UI logic, state management, and provides data in a format the View can easily consume.
  • Exposes commands and properties that the View binds to.
  • Example: A CustomerViewModel exposing properties like FullName or commands like SaveCustomer.

Benefits of MVVM

  • Separation of Concerns: UI code is decoupled from business logic, making the system more maintainable.
  • Improved Testability: Since the ViewModel doesn’t depend on UI elements, it can be easily unit tested.
  • Reusability: The same ViewModel can be used with different Views, increasing flexibility.
  • Collaboration: Designers can work on Views while developers work on ViewModels independently.

Advantages and Disadvantages

Advantages

  • Cleaner and more organized code structure.
  • Reduces duplication of logic across UI components.
  • Makes it easier to scale applications with complex user interfaces.

Disadvantages

  • Can introduce complexity for smaller projects where the overhead is unnecessary.
  • Learning curve for developers new to data binding and command patterns.
  • Requires careful planning to avoid over-engineering.

When Can We Use MVVM?

MVVM is best suited for:

  • Applications with complex or dynamic user interfaces.
  • Projects requiring strong separation of responsibilities.
  • Teams where designers and developers work closely together.
  • Applications needing high test coverage for business and UI logic.

Real World Example

Consider a banking application with a dashboard displaying account balances, recent transactions, and quick actions.

  • Model: Manages account data retrieved from a server.
  • View: The dashboard screen the user interacts with.
  • ViewModel: Provides observable properties like Balance, TransactionList, and commands such as TransferMoney.

This allows changes in the Model (like a new transaction) to automatically update the View without direct coupling.

Integrating MVVM into Our Software Development Process

  1. Identify UI Components: Break down your application into Views and determine the data each needs.
  2. Design ViewModels: Create ViewModels to expose the required data and commands.
  3. Implement Models: Build Models that handle business rules and data access.
  4. Apply Data Binding: Bind Views to ViewModels for real-time updates.
  5. Testing: Write unit tests for ViewModels to ensure correctness without relying on the UI.
  6. Iterate: As requirements change, update ViewModels and Models while keeping the View lightweight.

Minimum Viable Product (MVP) in Software Development

Learning minimum viable product

When developing a new product, one of the most effective strategies is to start small, test your ideas, and grow based on real feedback. This approach is called creating a Minimum Viable Product (MVP).

What is a Minimum Viable Product?

A Minimum Viable Product (MVP) is the most basic version of a product that still delivers value to users. It is not a full-fledged product with every feature imagined, but a simplified version that solves the core problem and allows you to test your concept in the real world.

The MVP focuses on answering one important question: Does this product solve a real problem for users?

Key Features of an MVP

  1. Core Functionality Only
    An MVP should focus on the most essential features that directly address the problem. Extra features can be added later once feedback is collected.
  2. Usability
    Even though it is minimal, the product must be usable. Users should be able to complete the core task smoothly without confusion.
  3. Scalability Consideration
    While it starts small, the design should not block future growth. The MVP should be a foundation for future improvements.
  4. Fast to Build
    The MVP must be developed quickly so that testing and feedback cycles can begin early. Speed is one of its key strengths.
  5. Feedback-Driven
    The MVP should make it easy to collect feedback from users, whether through analytics, surveys, or usage data.

Purpose of an MVP

The main purpose of an MVP is validation. Before investing large amounts of time and resources, companies want to know if their idea will actually succeed.

  • It allows testing assumptions with real users.
  • It helps confirm whether the problem you are solving is truly important.
  • It prevents wasting resources on features or ideas that don’t matter to customers.
  • It provides early market entry and brand visibility.

In short, the purpose of an MVP is to reduce risk while maximizing learning.

Benefits of an MVP

  1. Cost Efficiency
    Instead of spending a large budget on full development, an MVP helps you invest small and learn quickly.
  2. Faster Time to Market
    You can launch quickly, test your idea, and make improvements while competitors are still planning.
  3. Real User Feedback
    MVP development lets you learn directly from your audience instead of guessing what they want.
  4. Reduced Risk
    By validating assumptions early, you avoid investing in products that may not succeed.
  5. Investor Confidence
    If your MVP shows traction, it becomes easier to attract investors and funding.

Real-World Example of an MVP

One famous example is Dropbox. Before building the full product, Dropbox created a simple video demonstrating how their file-sharing system would work. The video attracted thousands of sign-ups from people who wanted the product, proving the idea had strong demand. Based on this validation, Dropbox built and released the full product, which later became a global success.

How to Use an MVP in Software Development

  1. Identify the Core Problem
    Focus on the exact problem your software aims to solve.
  2. Select Key Features Only
    Build only the features necessary to address the core problem.
  3. Develop Quickly
    Keep development short and simple. The goal is learning, not perfection.
  4. Release to a Small Audience
    Test with early adopters who are willing to give feedback.
  5. Collect Feedback and Iterate
    Use customer feedback to improve the product step by step.
  6. Scale Gradually
    Once validated, add new features and expand your product.

By adopting the MVP approach, software teams can innovate faster, reduce risk, and build products that truly meet customer needs.

Separation of Concerns (SoC) in Software Engineering

Learning Separation of Concerns

Separation of Concerns (SoC) is a foundational design principle: split your system into parts, where each part focuses on a single, well-defined responsibility. Done well, SoC makes code easier to understand, test, change, scale, and secure.

What is Separation of Concerns?

SoC means organizing software so that each module addresses one concern (a responsibility or “reason to change”) and hides the details of that concern behind clear interfaces.

  • Concern = a cohesive responsibility: UI rendering, data access, domain rules, logging, authentication, caching, configuration, etc.
  • Separation = boundaries (files, classes, packages, services) that prevent concerns from leaking into each other.

Related but different concepts

  • Single Responsibility Principle (SRP): applies at the class/function level. SoC applies at system/module scale.
  • Modularity: a property of structure; SoC is the guiding principle that tells you how to modularize.
  • Encapsulation: the technique that makes separation effective (hide internals, expose minimal interfaces).

How SoC Works

  1. Identify Axes of Change
    Ask: If this changes, what else would need to change? Group code so that each axis of change is isolated (e.g., UI design changes vs. database vendor changes vs. business rules changes).
  2. Define Explicit Boundaries
    • Use layers (Presentation → Application/Service → Domain → Infrastructure/DB).
    • Or vertical slices (Feature A, Feature B), each containing its own UI, logic, and data adapters.
    • Or services (Auth, Catalog, Orders) with network boundaries.
  3. Establish Contracts
    • Interfaces/DTOs so layers talk in clear, stable shapes.
    • APIs so services communicate without sharing internals.
    • Events so features integrate without tight coupling.
  4. Enforce Directional Dependencies
    • High-level policy (domain rules) should not depend on low-level details (database, frameworks).
    • In code, point dependencies inward to abstractions (ports), and keep details behind adapters.
  5. Extract Cross-Cutting Concerns
    • Logging, metrics, auth, validation, caching → implement via middleware, decorators, AOP, or interceptors, not scattered everywhere.
  6. Automate Guardrails
    • Lint rules and architecture tests (e.g., “controllers must not import repositories directly”).
    • Package visibility (e.g., Java package-private), access modifiers, and module boundaries.

Benefits of SoC

  • Change isolation: Modify one concern without ripple effects (e.g., swap PostgreSQL for MySQL by changing only the DB adapter).
  • Testability: Unit tests target a single concern; integration tests verify boundaries; fewer mocks in the wrong places.
  • Reusability: A cleanly separated module (e.g., a pricing engine) can be reused in multiple apps.
  • Parallel development: Teams own concerns or slices without stepping on each other.
  • Scalability & performance: Scale just the hot path (e.g., cache layer or read model) instead of the whole system.
  • Security & compliance: Centralize auth, input validation, and auditing, reducing duplicate risky code.
  • Maintainability: Clear mental model; easier onboarding and refactoring.
  • Observability: Centralized logging/metrics make behavior consistent and debuggable.

Real-World Examples

Web Application (Layered)

  • Presentation: Controllers/Views (HTTP/JSON rendering)
  • Application/Service: Use cases, orchestration
  • Domain: Business rules, entities, value objects
  • Infrastructure: Repositories, messaging, external APIs

Result: Changing UI styling, a pricing rule, or a database index touches different isolated areas.

Front-End (HTML/CSS/JS + State)

  • Structure (HTML/Components) separated from Style (CSS) and Behavior (JS/state).
  • State management (e.g., Redux/Pinia) isolates data flow from view rendering.

Microservices

  • Auth, Catalog, Orders, Billing → each is a concern with its own storage and API.
  • Cross-cutters (logging, tracing, authN/Z) handled via API gateway or shared middleware.

Data Pipelines

  • Ingestion, Normalization, Enrichment, Storage, Serving/BI → separate stages with contracts (schemas).
  • You can replace enrichment logic without touching ingestion.

Cross-Cutting via Middleware

  • Input validation, rate limiting, and structured logging implemented as filters or middleware so business code stays clean.

How to Use SoC in Your Projects

Step-by-Step

  1. Map your concerns
    List core domains (billing, content, search), technical details (DB, cache), and cross-cutters (logging, auth).
  2. Choose a structuring strategy
    • Layers for monoliths and small/medium teams.
    • Vertical feature slices to reduce coordination overhead.
    • Services for independently deployable boundaries (start small—modular monolith first).
  3. Define contracts and boundaries
    • Create interfaces/ports for infrastructure.
    • Use DTOs/events to decouple modules.
    • For services, design versioned APIs.
  4. Refactor incrementally
    • Extract cross-cutters into middleware or decorators.
    • Move data access behind repositories or gateways.
    • Pull business rules into the domain layer.
  5. Add guardrails
    • Architecture tests (e.g., ArchUnit for Java) to forbid forbidden imports.
    • CI checks for dependency direction and circular references.
  6. Document & communicate
    • One diagram per feature or layer (C4 model is a good fit).
    • Ownership map: who maintains which concern.
  7. Continuously review
    • Add “Does this leak a concern?” to PR checklists.
    • Track coupling metrics (instability, afferent/efferent coupling).

Mini Refactor Example (Backend)

Before:
OrderController -> directly talks to JPA Repository
                 -> logs with System.out
                 -> performs validation inline

After:
OrderController -> OrderService (use case)
OrderService -> OrderRepository (interface)
              -> ValidationService (cross-cutter)
              -> Logger (injected)
JpaOrderRepository implements OrderRepository
Logging via middleware/interceptor

Result: You can swap JPA for another store by changing only JpaOrderRepository. Validation and logging are reusable elsewhere.

Patterns That Support SoC

  • MVC/MVP/MVVM: separates UI concerns (view) from presentation and domain logic.
  • Clean/Hexagonal (Ports & Adapters): isolates domain from frameworks and IO.
  • CQRS: separate reads and writes when their concerns diverge (performance, scaling).
  • Event-Driven: decouple features with async events.
  • Dependency Injection: wire implementations to interfaces at the edges.
  • Middleware/Interceptors/Filters: centralize cross-cutting concerns.

Practical, Real-World Examples

  • Feature flags as a concern: toggle new rules in the app layer; domain remains untouched.
  • Search adapters: your app depends on a SearchPort; switch from Elasticsearch to OpenSearch without changing business logic.
  • Payments: domain emits PaymentRequested; payment service handles gateways and retries—domain doesn’t know vendor details.
  • Mobile app MVVM: ViewModel holds state/logic; Views remain dumb; repositories handle data sources.

Common Mistakes (and Fixes)

  • Over-separation (micro-everything): too many tiny modules → slow delivery.
    • Fix: start with a modular monolith, extract services only for hot spots.
  • Leaky boundaries: UI reaches into repositories, or domain knows HTTP.
    • Fix: enforce through interfaces and architecture tests.
  • Cross-cutters sprinkled everywhere: copy-paste validation/logging.
    • Fix: move to middleware/decorators/aspects.
  • God objects/modules: a “Utils” that handles everything.
    • Fix: split by concern; create dedicated packages.

Quick Checklist

  • Does each module have one primary reason to change?
  • Are dependencies pointing inward toward abstractions?
  • Are cross-cutting concerns centralized?
  • Can I swap an implementation (DB, API, style) by touching one area?
  • Do tests cover each concern in isolation?
  • Are there docs/diagrams showing boundaries and contracts?

How to Start Using SoC This Week

  • Create a dependency graph of your project (most IDEs or linters can help).
  • Pick one hot spot (e.g., payment, auth, reporting) and extract its interfaces/adapters.
  • Introduce a middleware layer for logging/validation/auth.
  • Write one architecture test that forbids controllers from importing repositories.
  • Document one boundary with a simple diagram and ownership.

FAQ

Is SoC the same as microservices?
No. Microservices are one way to enforce separation at runtime. You can achieve strong SoC inside a monolith.

How small should a concern be?
A concern should map to a cohesive responsibility and an axis of change. If changes to it often require touching multiple modules, your boundary is probably wrong.

Is duplication ever okay?
Yes, small local duplication can be cheaper than a shared module that couples unrelated features. Optimize for change cost, not just DRY.

Final Thoughts

Separation of Concerns is about clarity and change-friendliness. Start by identifying responsibilities, draw clean boundaries, enforce them with code and tests, and evolve your structure as the product grows. Your future self (and your teammates) will thank you.

Test Driven Development (TDD): A Complete Guide

Learning Test Driven Evelopment

What is Test Driven Development?

Test Driven Development (TDD) is a software development practice where tests are written before the actual code. The main idea is simple: first, you write a failing test that defines what the software should do, then you write just enough code to make the test pass, and finally, you improve the code through refactoring.

TDD encourages developers to focus on requirements and expected behavior rather than jumping directly into implementation details.

A Brief History of TDD

TDD is closely tied to Extreme Programming (XP), introduced in the late 1990s by Kent Beck. Beck emphasized automated testing as a way to improve software quality and developer confidence. While unit testing existed earlier, TDD formalized the cycle of writing tests before writing code and popularized it as a disciplined methodology.

How Does TDD Work?

TDD typically follows a simple cycle, often called Red-Green-Refactor:

  1. Red – Write a small test that fails because the functionality does not exist yet.
  2. Green – Write the minimum code required to pass the test.
  3. Refactor – Improve the code structure without changing its behavior, while keeping all tests passing.

This cycle is repeated for each new piece of functionality until the feature is fully developed.

Important Steps in TDD

  • Understand requirements clearly before starting.
  • Write a failing test case for the expected behavior.
  • Implement code to make the test pass.
  • Run all tests to ensure nothing else is broken.
  • Refactor code for clarity, performance, and maintainability.
  • Repeat for each new requirement or functionality.

Advantages of TDD

  • Ensures better code quality and fewer bugs.
  • Encourages modular and clean code design.
  • Provides a safety net for refactoring and adding new features.
  • Reduces debugging time since most errors are caught early.
  • Improves developer confidence and project maintainability.

Disadvantages of TDD

  • Initial learning curve can be steep for teams new to the practice.
  • Writing tests first may feel slower at the beginning.
  • Requires discipline and consistency; skipping steps reduces its effectiveness.
  • Not always practical for UI-heavy applications or experimental projects.

Should We Use TDD in Our Projects?

The decision depends on your project type, deadlines, and team maturity. TDD works best in:

  • Long-term projects that need high maintainability.
  • Systems requiring reliability and accuracy (e.g., finance, healthcare, safety systems).
  • Teams practicing Agile or XP methodologies.

For quick prototypes or proof-of-concepts, TDD might not always be the best choice.

Integrating TDD into the Software Development Cycle

  • Combine TDD with Agile or Scrum for iterative development.
  • Use Continuous Integration (CI) pipelines to automatically run tests on every commit.
  • Pair TDD with code review practices for stronger quality control.
  • Start with unit tests, then expand to integration and system tests.
  • Train your team with small exercises, such as Kata challenges, to build TDD discipline.

Conclusion

Test Driven Development is more than just writing tests; it’s a mindset that prioritizes quality, clarity, and confidence in your code. While it requires discipline and may feel slow at first, TDD pays off in the long run by reducing bugs, improving maintainability, and making your development process more predictable.

If your project values stability, collaboration, and scalability, then TDD is a powerful practice to adopt.

Extreme Programming (XP): A Complete Guide

What is Extreme Programming?

Extreme Programming (XP) is an agile software development methodology that emphasizes customer satisfaction, flexibility, and high-quality code. It focuses on short development cycles, frequent releases, constant communication with stakeholders, and continuous improvement. The name “extreme” comes from the idea of taking best practices in software development to an extreme level—such as testing, code reviews, and communication.

A Brief History of Extreme Programming

Extreme Programming was introduced in the late 1990s by Kent Beck while he was working on the Chrysler Comprehensive Compensation System (C3 project). Beck published the book Extreme Programming Explained in 1999, which formalized the methodology.
XP emerged at a time when traditional software development methods (like the Waterfall model) struggled with rapid change, unclear requirements, and long delivery cycles. XP provided an alternative: a flexible, customer-driven approach aligned with the Agile Manifesto (2001).

Key Concepts of Extreme Programming

XP is built around several fundamental concepts:

  • Communication – Constant interaction between developers, customers, and stakeholders.
  • Simplicity – Keep designs and code as simple as possible, avoiding over-engineering.
  • Feedback – Continuous feedback from customers and automated tests.
  • Courage – Developers should not fear changing code, improving design, or discarding work.
  • Respect – Teams value each other’s work and contributions.

Core Practices of Extreme Programming

XP emphasizes a set of engineering practices that make the methodology unique. Below are its key practices with explanations:

1. Pair Programming

Two developers work together at one workstation. One writes code (the driver) while the other reviews in real-time (the observer). This increases code quality and knowledge sharing.

2. Test-Driven Development (TDD)

Developers write automated tests before writing the actual code. This ensures the system works as intended and reduces defects.

3. Continuous Integration

Developers integrate code into the shared repository several times a day. Automated tests run on each integration to detect issues early.

4. Small Releases

Software is released in short cycles (e.g., weekly or bi-weekly), delivering incremental value to customers.

5. Refactoring

Developers continuously improve the structure of code without changing its functionality. This keeps the codebase clean and maintainable.

6. Coding Standards

The whole team follows the same coding guidelines to maintain consistency.

7. Collective Code Ownership

No piece of code belongs to one developer. Everyone can change any part of the code, which increases collaboration and reduces bottlenecks.

8. Simple Design

Developers design only what is necessary for the current requirements, avoiding unnecessary complexity.

9. On-Site Customer

A real customer representative is available to the team daily to provide feedback and clarify requirements.

10. Sustainable Pace (40-hour work week)

Developers should avoid burnout. XP discourages overtime to maintain productivity and quality over the long term.

Advantages of Extreme Programming

  • High customer satisfaction due to continuous involvement.
  • Improved software quality from TDD, pair programming, and continuous integration.
  • Flexibility to adapt to changing requirements.
  • Better teamwork and communication.
  • Frequent releases ensure value is delivered early.

Disadvantages of Extreme Programming

  • Requires strong discipline from developers to follow practices consistently.
  • High customer involvement may be difficult to maintain.
  • Pair programming can feel costly and inefficient if not done correctly.
  • Not suitable for very large teams without adjustments.
  • May seem chaotic to organizations used to rigid structures.

Do We Need Extreme Programming in Software Development?

The answer depends on your team size, project type, and customer needs.

  • XP is highly effective in projects with uncertain requirements, where customer collaboration is possible.
  • It is valuable when quality and speed are equally important, such as in startups or rapidly evolving industries.
  • However, if your team is large, distributed, or your customers cannot commit to daily involvement, XP may not be the best fit.

In conclusion, XP is not a one-size-fits-all solution, but when applied correctly, it can significantly improve both product quality and team morale.

Understanding CI/CD Pipelines: A Complete Guide

Learning CI/CD pipelines

What Are CI/CD Pipelines?

What is CI/CD pipeline?

CI/CD stands for Continuous Integration and Continuous Delivery (or Deployment).
A CI/CD pipeline is a series of automated steps that help developers build, test, and deploy software more efficiently. Instead of waiting for long release cycles, teams can deliver updates to production quickly and reliably.

In simple terms, it is the backbone of modern DevOps practices, ensuring that code changes move smoothly from a developer’s laptop to production with minimal friction.

A Brief History of CI/CD

The idea of Continuous Integration was first popularized in the early 2000s through Extreme Programming (XP) practices. Developers aimed to merge code frequently and test it automatically to prevent integration issues.
Later, the concept of Continuous Delivery emerged, emphasizing that software should always be in a deployable state. With the rise of cloud computing and DevOps in the 2010s, Continuous Deployment extended this idea further, automating the final release step.

Today, CI/CD has become a standard in software engineering, supported by tools such as Jenkins, GitLab CI, GitHub Actions, CircleCI, and Azure DevOps.

Why Do We Need CI/CD Pipelines?

Without CI/CD, teams often face:

  • Integration problems when merging code late in the process.
  • Manual testing bottlenecks that slow down releases.
  • Risk of production bugs due to inconsistent environments.

CI/CD addresses these challenges by:

  • Automating builds and tests.
  • Providing rapid feedback to developers.
  • Reducing the risks of human error.

Key Benefits of CI/CD

  1. Faster Releases – Automations allow frequent deployments.
  2. Improved Quality – Automated tests catch bugs earlier.
  3. Better Collaboration – Developers merge code often, avoiding “integration hell.”
  4. Increased Confidence – Teams can push changes to production knowing the pipeline validates them.
  5. Scalability – Works well across small teams and large enterprises.

How Can We Use CI/CD in Our Projects?

Implementing CI/CD starts with:

  • Version Control Integration – Use Git repositories (GitHub, GitLab, Bitbucket).
  • CI/CD Tool Setup – Configure Jenkins, GitHub Actions, or other services.
  • Defining Stages – Common pipeline stages include:
    • Build – Compile the code and create artifacts.
    • Test – Run unit, integration, and functional tests.
    • Deploy – Push to staging or production environments.

Managing pipelines requires:

  • Infrastructure as Code (IaC) to keep environments consistent.
  • Monitoring and Logging to track pipeline health.
  • Regular maintenance of dependencies, tools, and scripts.

Can We Test the Pipelines?

Yes—and we should!
Testing pipelines ensures that the automation itself is reliable. Common practices include:

  • Pipeline Linting – Validate the configuration syntax.
  • Dry Runs – Run pipelines in a safe environment before production.
  • Self-Testing Pipelines – Use automated tests to verify the pipeline logic.
  • Chaos Testing – Intentionally break steps to confirm resilience.

Just as we test our applications, testing the pipeline gives confidence that deployments won’t fail when it matters most.

Conclusion

CI/CD pipelines are no longer a “nice to have”—they are essential for modern software development. They speed up delivery, improve code quality, and reduce risks. By implementing and maintaining well-designed pipelines, teams can deliver value to users continuously and confidently.

If you haven’t already, start small—integrate automated builds and tests, then expand toward full deployment automation. Over time, your CI/CD pipeline will become one of the most powerful assets in your software delivery process.

Related Posts

Blog at WordPress.com.

Up ↑