Search

Software Engineer's Notes

Tag

software-development

Outbox Pattern in Software Development

What is outbox pattern?

What is the Outbox Pattern?

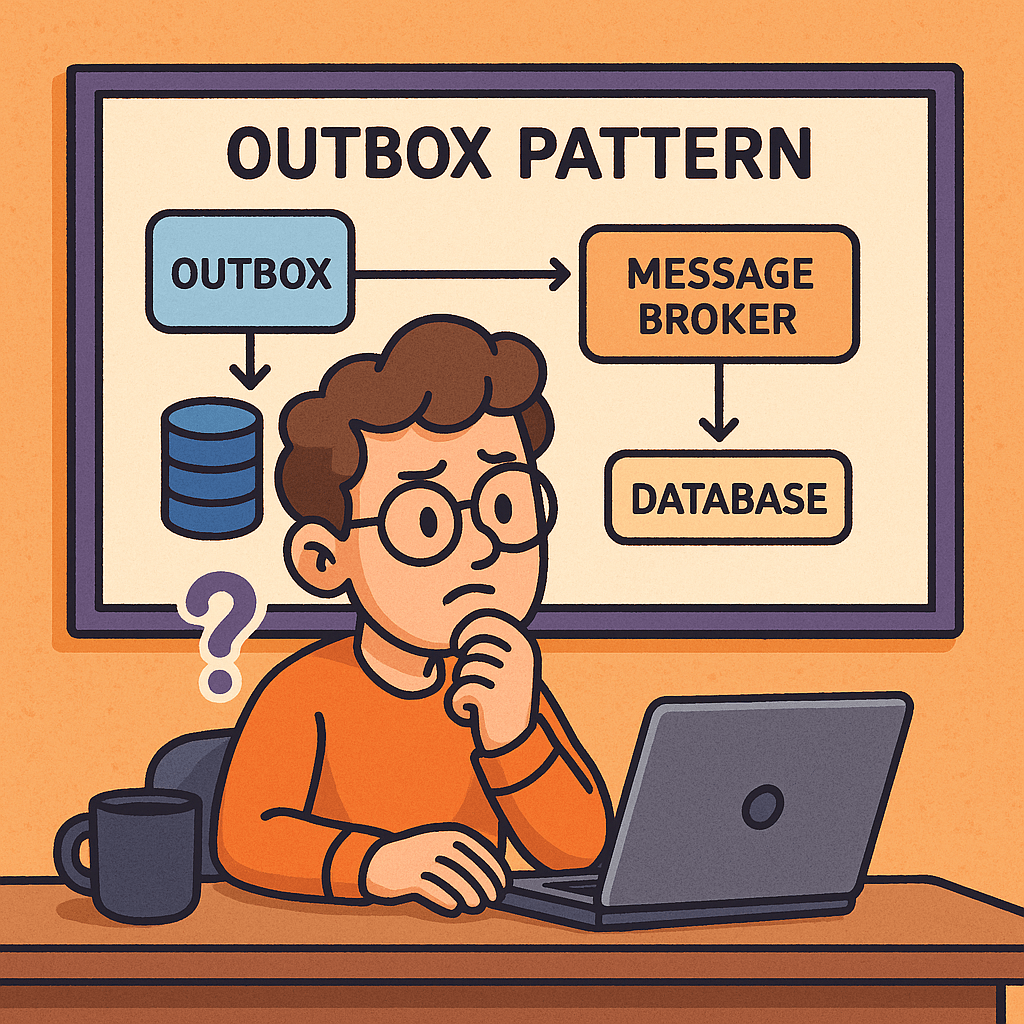
The Outbox Pattern is a design pattern commonly used in distributed systems and microservices to ensure reliable message delivery. It addresses the problem of data consistency when a service needs to both update its database and send an event or message (for example, to a message broker like Kafka, RabbitMQ, or an event bus).

Instead of directly sending the event at the same time as writing to the database, the system first writes the event into an “outbox” table in the same database transaction as the business operation. A separate process then reads from the outbox and publishes the event to the message broker, ensuring that no events are lost even if failures occur.

How Does the Outbox Pattern Work?

  1. Business Transaction Execution
    • When an application performs a business action (e.g., order creation), it updates the primary database.
    • Along with this update, the application writes an event record to an Outbox table within the same transaction.
  2. Outbox Table
    • This table stores pending events that need to be published.
    • Because it’s part of the same transaction, the event and the business data are always consistent.
  3. Event Relay Process
    • A separate background job or service scans the Outbox table.
    • It reads the pending events and publishes them to the message broker (Kafka, RabbitMQ, AWS SNS/SQS, etc.).
  4. Marking Events as Sent
    • Once the event is successfully delivered, the system marks the record as processed (or deletes it).
    • This ensures events are not sent multiple times (unless idempotency is designed in).

Benefits and Advantages of the Outbox Pattern

1. Guaranteed Consistency

  • Ensures the business operation and the event are always in sync.
  • Avoids the “dual write” problem, where database and message broker updates can go out of sync.

2. Reliability

  • No events are lost, even if the system crashes before publishing to the broker.
  • Events stay in the Outbox until safely delivered.

3. Scalability

  • Works well with microservices architectures where multiple services rely on events for communication.
  • Prevents data discrepancies across distributed systems.

4. Resilience

  • Recovers gracefully after failures.
  • Background jobs can retry delivery without affecting the original business logic.

Disadvantages of the Outbox Pattern

  1. Increased Complexity
    • Requires maintaining an additional outbox table and cleanup process.
    • Adds overhead in terms of storage and monitoring.
  2. Event Delivery Delay
    • Since events are delivered asynchronously via a polling job, there can be a slight delay between database update and event publication.
  3. Idempotency Handling
    • Consumers must be designed to handle duplicate events (because retries may occur).
  4. Operational Overhead
    • Requires monitoring outbox size, ensuring jobs run reliably, and managing cleanup policies.

Real World Examples

  • E-commerce Order Management
    When a customer places an order, the system stores the order in the database and writes an “OrderCreated” event in the Outbox. A background job later publishes this event to notify the Payment Service and Shipping Service.
  • Banking and Financial Systems
    A transaction record is stored in the database along with an outbox entry. The event is then sent to downstream fraud detection and accounting systems, ensuring that no financial transaction event is lost.
  • Logistics and Delivery Platforms
    When a package status changes, the update and the event notification (to notify the customer or update tracking systems) are stored together, ensuring both always align.

When and How Should We Use It?

When to Use It

  • In microservices architectures where multiple services must stay in sync.
  • When using event-driven systems with critical business data.
  • In cases where data loss is unacceptable (e.g., payments, orders, transactions).

How to Use It

  1. Add an Outbox Table
    Create an additional table in your database to store events.
  2. Write Events with Business Transactions
    Ensure your application writes to the Outbox within the same transaction as the primary data.
  3. Relay Service or Job
    Implement a background worker (cron job, Kafka Connect, Debezium CDC, etc.) that polls the Outbox and delivers events.
  4. Cleanup Strategy
    Define how to archive or delete processed events to prevent table bloat.

Integrating the Outbox Pattern into Your Current Software Development Process

  • Step 1: Identify Event Sources
    Find operations in your system where database updates must also trigger external events (e.g., order, payment, shipment).
  • Step 2: Implement Outbox Table
    Add an Outbox table to the same database schema to capture events reliably.
  • Step 3: Modify Business Logic
    Update services so that they not only store data but also write an event entry in the Outbox.
  • Step 4: Build Event Publisher
    Create a background service that publishes events from the Outbox to your event bus or message queue.
  • Step 5: Monitor and Scale
    Add monitoring for outbox size, processing delays, and failures. Scale your relay jobs as needed.

Conclusion

The Outbox Pattern is a powerful solution for ensuring reliable and consistent communication in distributed systems. It guarantees that critical business events are never lost and keeps systems in sync, even during failures. While it introduces some operational complexity, its reliability and consistency benefits make it a key architectural choice for event-driven and microservices-based systems.

Saga Pattern: Reliable Distributed Transactions for Microservices

What is saga pattern?

What Is a Saga Pattern?

A saga is a sequence of local transactions that update multiple services without a global ACID transaction. Each local step commits in its own database and publishes an event or sends a command to trigger the next step. If any step fails, the saga runs compensating actions to undo the work already completed. The result is eventual consistency across services.

How Does It Work?

Two Coordination Styles

  • Choreography (event-driven): Each service listens for events and emits new events after its local transaction. There is no central coordinator.
    Pros: simple, highly decoupled. Cons: flow becomes hard to visualize/govern as steps grow.
  • Orchestration (command-driven): A dedicated orchestrator (or “process manager”) tells services what to do next and tracks state.
    Pros: clear control and visibility. Cons: one more component to run and scale.

Compensating Transactions

Instead of rolling back with a global lock, sagas use compensation—business-level “undo” (e.g., “release inventory”, “refund payment”). Compensations must be idempotent and safe to retry.

Success & Failure Paths

  • Happy path: Step A → Step B → Step C → Done
  • Failure path: Step B fails → run B’s compensation (if needed) → run A’s compensation → saga ends in a terminal “compensated” state.

How to Implement a Saga (Step-by-Step)

  1. Model the business workflow
    • Write the steps, inputs/outputs, and compensation rules for each step.
    • Define when the saga starts, ends, and the terminal states.
  2. Choose coordination style
    • Start with orchestration for clarity on complex flows; use choreography for small, stable workflows.
  3. Define messages
    • Commands (do X) and events (X happened). Include correlation IDs and idempotency keys.
  4. Persist saga state
    • Keep a saga log/state (e.g., “PENDING → RESERVED → CHARGED → SHIPPED”). Store step results and compensation status.
  5. Guarantee message delivery
    • Use a broker (e.g., Kafka/RabbitMQ/Azure Service Bus). Implement at-least-once delivery + idempotent handlers.
    • Consider the Outbox pattern so DB changes and messages are published atomically.
  6. Retries, timeouts, and backoff
    • Add exponential backoff and timeouts per step. Use dead-letter queues for poison messages.
  7. Design compensations
    • Make them idempotent, auditable, and business-correct (refund, release, cancel, notify).
  8. Observability
    • Emit traces (OpenTelemetry), metrics (success rate, average duration, compensation rate), and structured logs with correlation IDs.
  9. Testing
    • Unit test each step and its compensation.
    • Contract test message schemas.
    • End-to-end tests for happy & failure paths (including chaos/timeout scenarios).
  10. Production hardening checklist
  • Schema versioning, consumer backward compatibility
  • Replay safety (idempotency)
  • Operational runbooks for stuck/partial sagas
  • Access control on orchestration commands

Mini Orchestration Sketch (Pseudocode)

startSaga(orderId):
  save(state=PENDING)
  send ReserveInventory(orderId)

on InventoryReserved(orderId):
  save(state=RESERVED)
  send ChargePayment(orderId)

on PaymentCharged(orderId):
  save(state=CHARGED)
  send CreateShipment(orderId)

on ShipmentCreated(orderId):
  save(state=COMPLETED)

on StepFailed(orderId, step):
  runCompensationsUpTo(step)
  save(state=COMPENSATED)

Main Features

  • Long-lived, distributed workflows with eventual consistency
  • Compensating transactions instead of global rollbacks
  • Asynchronous messaging and decoupled services
  • Saga state/log for reliability, retries, and audits
  • Observability hooks (tracing, metrics, logs)
  • Idempotent handlers and deduplication for safe replays

Advantages & Benefits (In Detail)

  • High availability: No cross-service locks or 2PC; services stay responsive.
  • Business-level correctness: Compensations reflect real business semantics (refunds, releases).
  • Scalability & autonomy: Each service owns its data; sagas coordinate outcomes, not tables.
  • Resilience to partial failures: Built-in retries, timeouts, and compensations.
  • Clear audit trail: Saga state/log makes post-mortems and compliance easier.
  • Evolvability: Add steps or change flows with isolated deployments and versioned events.

When and Why You Should Use It

Use sagas when:

  • A process spans multiple services/datastores and global transactions aren’t available (or are too costly).
  • Steps are long-running (minutes/hours) and eventual consistency is acceptable.
  • You need business-meaningful undo (refund, release, cancel).

Prefer simpler patterns when:

  • All updates are inside one service/database with ACID support.
  • The process is tiny and won’t change—choreography might still be fine, but a direct call chain could be simpler.

Real-World Examples (Detailed)

  1. E-commerce Checkout
    • Steps: Reserve inventory → Charge payment → Create shipment → Confirm order
    • Failure: If shipment creation fails, refund payment, release inventory, cancel order, notify customer.
  2. Travel Booking
    • Steps: Hold flight → Hold hotel → Hold car → Confirm all and issue tickets
    • Failure: If hotel hold fails, release flight/car holds and void payments.
  3. Banking Transfers
    • Steps: Debit source → Credit destination → Notify
    • Failure: If credit fails, reverse debit and flag account for review.
  4. KYC-Gated Subscription
    • Steps: Create account → Run KYC → Activate subscription → Send welcome
    • Failure: If KYC fails, deactivate, refund, delete PII per policy.

Integrating Sagas into Your Software Development Process

  1. Architecture & Design
    • Start with domain event storming or BPMN to map steps and compensations.
    • Choose orchestration for complex flows; choreography for simple, stable ones.
    • Define message schemas (JSON/Avro), correlation IDs, and error contracts.
  2. Team Practices
    • Consumer-driven contracts for messages; enforce schema compatibility in CI.
    • Readiness checklists before adding a new step: idempotency, compensation, timeout, metrics.
    • Playbooks for manual compensation, replay, and DLQ handling.
  3. Platform & Tooling
    • Message broker, saga state store, and a dashboard for monitoring runs.
    • Consider helpers/frameworks (e.g., workflow engines or lightweight state machines) if they fit your stack.
  4. CI/CD & Operations
    • Use feature flags to roll out steps incrementally.
    • Add synthetic transactions in staging to exercise both happy and compensating paths.
    • Capture traces/metrics and set alerts on compensation spikes, timeouts, and DLQ growth.
  5. Security & Compliance
    • Propagate auth context safely; authorize orchestrator commands.
    • Keep audit logs of compensations; plan for PII deletion and data retention.

Quick Implementation Checklist

  • Business steps + compensations defined
  • Orchestration vs. choreography decision made
  • Message schemas with correlation/idempotency keys
  • Saga state persistence + outbox pattern
  • Retries, timeouts, DLQ, backoff
  • Idempotent handlers and duplicate detection
  • Tracing, metrics, structured logs
  • Contract tests + end-to-end failure tests
  • Ops playbooks and dashboards

Sagas coordinate multi-service workflows through local commits + compensations, delivering eventual consistency without 2PC. Start with a clear model, choose orchestration for complex flows, make every step idempotent & observable, and operationalize with retries, timeouts, outbox, DLQ, and dashboards.

Aspect-Oriented Programming (AOP) in Software Development

What is aspect oriented programming?

Software systems grow complex over time, often combining business logic, infrastructure, and cross-cutting concerns. To manage this complexity, developers rely on design paradigms. One such paradigm that emerged to simplify and modularize software is Aspect-Oriented Programming (AOP).

What is Aspect-Oriented Programming?

Aspect-Oriented Programming (AOP) is a programming paradigm that focuses on separating cross-cutting concerns from the main business logic of a program.
In traditional programming approaches, such as Object-Oriented Programming (OOP), concerns like logging, security, transaction management, or error handling often end up scattered across multiple classes and methods. AOP provides a structured way to isolate these concerns into reusable modules called aspects, improving code clarity, maintainability, and modularity.

History of Aspect-Oriented Programming

The concept of AOP was first introduced in the mid-1990s at Xerox Palo Alto Research Center (PARC) by Gregor Kiczales and his team.
They noticed that even with the widespread adoption of OOP, developers struggled with the “tangling” and “scattering” of cross-cutting concerns in enterprise systems. OOP did a good job encapsulating data and behavior, but it wasn’t effective for concerns that affected multiple modules at once.

To solve this, Kiczales and colleagues developed AspectJ, an extension to the Java programming language, which became the first practical implementation of AOP. AspectJ made it possible to write aspects separately and weave them into the main application code at compile time or runtime.

Over the years, AOP spread across multiple programming languages, frameworks, and ecosystems, especially in enterprise software development.

Main Concerns Addressed by AOP

AOP primarily targets cross-cutting concerns, which are functionalities that span across multiple modules. Common examples include:

  • Logging – capturing method calls and system events.
  • Security – applying authentication and authorization consistently.
  • Transaction Management – ensuring database operations are atomic and consistent.
  • Performance Monitoring – tracking execution time of functions.
  • Error Handling – managing exceptions in a centralized way.
  • Caching – applying caching policies without duplicating code.

Main Components of AOP

Aspect-Oriented Programming is built around a few core concepts:

  • Aspect – A module that encapsulates a cross-cutting concern.
  • Join Point – A point in the program execution (like a method call or object creation) where additional behavior can be inserted.
  • Pointcut – A set of join points where an aspect should be applied.
  • Advice – The action taken by an aspect at a join point (before, after, or around execution).
  • Weaving – The process of linking aspects with the main code. This can occur at compile time, load time, or runtime.

How AOP Works

Here’s a simplified workflow of how AOP functions:

  1. The developer defines aspects (e.g., logging or security).
  2. Within the aspect, pointcuts specify where in the application the aspect should apply.
  3. Advices define what code runs at those pointcuts.
  4. During weaving, the AOP framework inserts the aspect’s logic into the appropriate spots in the main application.

This allows the business logic to remain clean and focused, while cross-cutting concerns are modularized.

Benefits of Aspect-Oriented Programming

  • Improved Modularity – separates business logic from cross-cutting concerns.
  • Better Maintainability – changes to logging, security, or monitoring can be made in one place.
  • Reusability – aspects can be reused across multiple projects.
  • Cleaner Code – reduces code duplication and improves readability.
  • Scalability – simplifies large applications by isolating infrastructure logic.

When and How to Use AOP

AOP is particularly useful in enterprise systems where cross-cutting concerns are numerous and repetitive. Some common scenarios:

  • Web applications – for security, session management, and performance monitoring.
  • Financial systems – for enforcing consistent auditing and transaction management.
  • Microservices – for centralized logging and tracing across distributed services.
  • API Development – for applying rate-limiting, authentication, and exception handling consistently.

To use AOP effectively, it’s often integrated with frameworks. For example:

  • In Java, Spring AOP and AspectJ are popular choices.
  • In .NET, libraries like PostSharp provide AOP capabilities.
  • In Python and JavaScript, decorators and proxies mimic many AOP features.

Real-World Examples

  1. Logging with Spring AOP (Java)
    Instead of writing logging code inside every service method, a logging aspect captures method calls automatically, reducing duplication.
  2. Security in Web Applications
    A security aspect checks user authentication before allowing access to sensitive methods, ensuring consistency across the system.
  3. Transaction Management in Banking Systems
    A transaction aspect ensures that if one operation in a multi-step process fails, all others roll back, maintaining data integrity.
  4. Performance Monitoring
    An aspect measures execution time for functions and logs slow responses, helping developers optimize performance.

Conclusion

Aspect-Oriented Programming is not meant to replace OOP but to complement it by addressing concerns that cut across multiple parts of an application. By cleanly separating cross-cutting concerns, AOP helps developers write cleaner, more modular, and more maintainable code.

In modern enterprise development, frameworks like Spring AOP make it straightforward to integrate AOP into existing projects, making it a powerful tool for building scalable and maintainable software systems.

Inversion of Control in Software Development

Inversion of Control

What is Inversion of Control?

Inversion of Control (IoC) is a design principle in software engineering that shifts the responsibility of controlling the flow of a program from the developer’s custom code to a framework or external entity. Instead of your code explicitly creating objects and managing their lifecycles, IoC delegates these responsibilities to a container or framework.

This approach promotes flexibility, reusability, and decoupling of components. IoC is the foundation of many modern frameworks, such as Spring in Java, .NET Core Dependency Injection, and Angular in JavaScript.

A Brief History of Inversion of Control

The concept of IoC emerged in the late 1980s and early 1990s as object-oriented programming matured. Early implementations were seen in frameworks like Smalltalk MVC and later Java Enterprise frameworks.
The term “Inversion of Control” was formally popularized by Michael Mattsson in the late 1990s. Martin Fowler further explained and advocated IoC as a key principle for achieving loose coupling in his widely influential articles and books.

By the 2000s, IoC became mainstream with frameworks such as Spring Framework (2003) introducing dependency injection containers as practical implementations of IoC.

Components of Inversion of Control

Inversion of Control can be implemented in different ways, but the following components are usually involved:

1. IoC Container

A framework or container responsible for managing object creation and lifecycle. Example: Spring IoC Container.

2. Dependencies

The objects or services that a class requires to function.

3. Configuration Metadata

Instructions provided to the IoC container on how to wire dependencies. This can be done using XML, annotations, or code.

4. Dependency Injection (DI)

A specific and most common technique to achieve IoC, where dependencies are provided rather than created inside the class.

5. Event and Callback Mechanisms

Another IoC technique where the flow of execution is controlled by an external framework calling back into the developer’s code when needed.

Benefits of Inversion of Control

1. Loose Coupling

IoC ensures that components are less dependent on each other, making code easier to maintain and extend.

2. Improved Testability

With dependencies injected, mocking and testing become straightforward.

3. Reusability

Since classes do not create their own dependencies, they can be reused in different contexts.

4. Flexibility

Configurations can be changed without altering the core logic of the program.

5. Scalability

IoC helps in scaling applications by simplifying dependency management in large systems.

Why and When Do We Need Inversion of Control?

  • When building complex systems with multiple modules requiring interaction.
  • When you need flexibility in changing dependencies without modifying code.
  • When testing is critical, since IoC makes mocking dependencies easy.
  • When aiming for maintainability, as IoC reduces the risk of tight coupling.

IoC is especially useful in enterprise applications, microservices, and modular architectures.

How to Integrate IoC into Our Software Development Process

  1. Choose a Framework or Container
    • For Java: Spring Framework or Jakarta CDI
    • For .NET: Built-in DI Container
    • For JavaScript: Angular or NestJS
  2. Identify Dependencies
    Review your code and highlight where objects are created and tightly coupled.
  3. Refactor Using DI
    Use constructor injection, setter injection, or field injection to provide dependencies instead of creating them inside classes.
  4. Configure Metadata
    Define wiring via annotations, configuration files, or code-based approaches.
  5. Adopt IoC Practices Gradually
    Start with small modules and expand IoC adoption across your system.
  6. Test and Validate
    Use unit tests with mocked dependencies to confirm that IoC is working as intended.

Conclusion

Inversion of Control is a powerful principle that helps developers build flexible, testable, and maintainable applications. By shifting control to frameworks and containers, software becomes more modular and adaptable to change. Integrating IoC into your development process is not only a best practice—it’s a necessity for modern, scalable systems.

Tight Coupling in Software: A Practical Guide

Tight coupling

Tight coupling means modules/classes know too much about each other’s concrete details. It can make small systems fast and straightforward, but it reduces flexibility and makes change risky as systems grow.

What Is Tight Coupling?

Tight coupling is when one component depends directly on the concrete implementation, lifecycle, and behavior of another. If A changes, B likely must change too. This is the opposite of loose coupling, where components interact through stable abstractions (interfaces, events, messages).

Signals of tight coupling

  • A class news another class directly and uses many of its concrete methods.
  • A module imports many symbols from another (wide interface).
  • Assumptions about initialization order, threading, or storage leak across boundaries.
  • Shared global state or singletons that many classes read/write.

How Tight Coupling Works (Mechanics)

Tight coupling emerges from decisions that bind components together:

  1. Concrete-to-concrete references
    Class A depends on Class B (not an interface or port).
class OrderService {
    private final EmailSender email = new SmtpEmailSender("smtp://corp");
    void place(Order o) {
        // ...
        email.send("Thanks for your order");
    }
}

  1. Wide interfaces / Feature leakage
    • A calls many methods of B, knowing inner details and invariants.
  2. Synchronous control flow
    • Caller waits for callee; caller assumes callee latency and failure modes.
  3. Shared state & singletons
    • Global caches, static utilities, or “God objects” pull everything together.
  4. Framework-driven lifecycles
    • Framework callbacks that force specific object graphs or method signatures.

Benefits of Tight Coupling (Yes, There Are Some)

Tight coupling isn’t always bad. It trades flexibility for speed of initial delivery and sometimes performance.

  • Simplicity for tiny scopes: Fewer abstractions, quicker to read and write.
  • Performance: Direct calls, fewer layers, less indirection.
  • Strong invariants: When two things truly belong together (e.g., math vector + matrix ops), coupling keeps them consistent.
  • Lower cognitive overhead in small utilities and scripts.

Advantages and Disadvantages

Advantages

  • Faster to start: Minimal plumbing, fewer files, fewer patterns.
  • Potentially faster at runtime: No serialization or messaging overhead.
  • Fewer moving parts: Useful for short-lived tools or prototypes.
  • Predictable control flow: Straight-line, synchronous logic.

Disadvantages

  • Hard to change: A change in B breaks A (ripple effects).
  • Difficult to test: Unit tests often require real dependencies or heavy mocks.
  • Low reusability: Components can’t be reused in different contexts.
  • Scaling pain: Hard to parallelize, cache, or deploy separately.
  • Vendor/framework lock-in: If coupling is to a framework, migrations are costly.

How to Achieve Tight Coupling (Intentionally)

If you choose tight coupling (e.g., for a small, performance-critical module), do it deliberately and locally.

  1. Instantiate concrete classes directly
PaymentGateway gw = new StripeGateway(apiKey);
gw.charge(card, amount);

  1. Use concrete methods (not interfaces) and accept wide method usage when appropriate.
  2. Share state where it simplifies correctness (small scopes only).
# module-level cache for a short script
_cache = {}

  1. Keep synchronous calls so the call stack shows the full story.
  2. Embed configuration (constants, URLs) in the module if the lifetime is short.

Tip: Fence it in. Keep tight coupling inside a small “island” or layer so it doesn’t spread across the codebase.

When and Why We Should Use Tight Coupling

Use tight coupling sparingly and intentionally when its trade-offs help:

  • Small, short-lived utilities or scripts where maintainability over years isn’t required.
  • Performance-critical inner loops where abstraction penalties matter.
  • Strong co-evolution domains where two components always change together.
  • Prototypes/experiments to validate an idea quickly (later refactor if it sticks).
  • Embedded systems / constrained environments where every cycle counts.

Avoid it when:

  • You expect team growth, feature churn, or multiple integrations.
  • You need independent deployability, A/B testing, or parallel development.
  • You operate in distributed systems where failure isolation matters.

Real-World Examples (Detailed)

1) In-App Image Processing Pipeline (Good Local Coupling)

A mobile app’s filter pipeline couples the FilterChain directly to concrete Filter implementations for maximum speed.

  • Why OK: The set of filters is fixed, performance-sensitive, maintained by one team.
  • Trade-off: Adding third-party filters later will be harder.

2) Hard-Wired Payment Provider (Risky Coupling)

A checkout service calls StripeGateway directly everywhere.

  • Upside: Quick launch, minimal code.
  • Downside: Switching to Adyen or adding PayPal requires sweeping refactors.
  • Mitigation: Keep coupling inside an Anti-Corruption Layer (one class). The rest of the app calls a small PaymentPort.

3) Microservice Calling Another Microservice Directly (Too-Tight)

Service A directly depends on Service B’s internal endpoints and data shapes.

  • Symptom: Any change in B breaks A; deployments must be coordinated.
  • Better: Introduce a versioned API or publish events; or add a facade between A and B.

4) UI Coupled to Backend Schema (Common Pain)

Frontend components import field names and validation rules straight from backend responses.

  • Problem: Backend change → UI breaks.
  • Better: Use a typed client SDK, DTOs, or a GraphQL schema with persisted queries to decouple.

How to Use Tight Coupling Wisely in Your Process

Design Guidelines

  • Bound it: Confine tight coupling to leaf modules or inner layers.
  • Document the decision: ADR (Architecture Decision Record) noting scope and exit strategy.
  • Hide it behind a seam: Public surface remains stable; internals can be tightly bound.

Coding Patterns

  • Composition over widespread references
    Keep the “coupled cluster” small and composed in one place.
  • Façade / Wrapper around tight-coupled internals
interface PaymentPort { void pay(Card c, Money m); }

class PaymentFacade implements PaymentPort {
    private final StripeGateway gw; // tight coupling inside
    PaymentFacade(String apiKey) { this.gw = new StripeGateway(apiKey); }
    public void pay(Card c, Money m) { gw.charge(c, m); }
}
// Rest of app depends on PaymentPort (loose), while facade stays tight to Stripe.

  • Module boundaries: Use packages/modules to keep coupling from leaking.

Testing Strategy

  • Test at the seam (integration tests) for the tightly coupled cluster.
  • Contract tests at the façade/interface boundary to protect consumers.
  • Performance tests if tight coupling was chosen for speed.

Refactoring Escape Hatch

If the prototype succeeds or requirements evolve:

  1. Extract an interface/port at the boundary.
  2. Move configuration out.
  3. Replace direct calls with adapters incrementally (Strangler Fig pattern).

Code Examples

Java: Tightly Coupled vs. Bounded Tight Coupling

Tightly coupled everywhere (hard to change):

class CheckoutService {
    void checkout(Order o) {
        StripeGateway gw = new StripeGateway(System.getenv("STRIPE_KEY"));
        gw.charge(o.getCard(), o.getTotal());
        gw.sendReceipt(o.getEmail());
    }
}

Coupling bounded to a façade (easier to change later):

interface PaymentPort {
    void pay(Card card, Money amount);
    void receipt(String email);
}

class StripePayment implements PaymentPort {
    private final StripeGateway gw;
    StripePayment(String key) { this.gw = new StripeGateway(key); }
    public void pay(Card card, Money amount) { gw.charge(card, amount); }
    public void receipt(String email) { gw.sendReceipt(email); }
}

class CheckoutService {
    private final PaymentPort payments;
    CheckoutService(PaymentPort payments) { this.payments = payments; }
    void checkout(Order o) {
        payments.pay(o.getCard(), o.getTotal());
        payments.receipt(o.getEmail());
    }
}

Python: Small Script Where Tight Coupling Is Fine

# image_resize.py (single-purpose, throwaway utility)
from PIL import Image  # direct dependency

def resize(path, w, h):
    img = Image.open(path)      # concrete API
    img = img.resize((w, h))    # synchronous, direct call
    img.save(path)

For a one-off tool, this tight coupling is perfectly reasonable.

Step-by-Step: Bringing Tight Coupling Into Your Process (Safely)

  1. Decide scope: Identify the small area where tight coupling yields value (performance, simplicity).
  2. Create a boundary: Expose a minimal interface/endpoint to the rest of the system.
  3. Implement internals tightly: Use concrete classes, direct calls, and in-process data models.
  4. Test the boundary: Write integration tests that validate the contract the rest of the system depends on.
  5. Monitor: Track change frequency; if churn increases, plan to loosen the coupling.
  6. Have an exit plan: ADR notes when to introduce interfaces, messaging, or configuration.

Decision Checklist (Use This Before You Tighten)

  • Is the module small and owned by one team?
  • Do the components change together most of the time?
  • Is performance critical and measured?
  • Can I hide the coupling behind a stable seam?
  • Do I have a plan to decouple later if requirements change?

If you answered “yes” to most, tight coupling might be acceptable—inside a fence.

Common Pitfalls and How to Avoid Them

  • Letting tight coupling leak across modules → Enforce boundaries with interfaces or DTOs.
  • Hard-coded config everywhere → Centralize in one place or environment variables.
  • Coupling to a framework (controllers use framework types in domain) → Map at the edges.
  • Test brittlenessPrefer contract tests at the seam; fewer mocks deep inside.

Final Thoughts

Tight coupling is a tool—useful in small, stable, or performance-critical areas. The mistake isn’t using it; it’s letting it spread unchecked. Fence it in, test the seam, and keep an exit strategy.

Understanding Loose Coupling in Software Development

What is Loose Coupling?

What is Loose Coupling?

Loose coupling is a design principle in software engineering where different components, modules, or services in a system are designed to have minimal dependencies on one another. This means that each component can function independently, with limited knowledge of the internal details of other components.

The opposite of loose coupling is tight coupling, where components are heavily dependent on each other’s internal implementation, making the system rigid and difficult to modify.

How Does Loose Coupling Work?

Loose coupling works by reducing the amount of direct knowledge and reliance that one module has about another. Instead of modules directly calling each other’s methods or accessing internal data structures, they interact through well-defined interfaces, abstractions, or contracts.

For example:

  • Instead of a class instantiating another class directly, it may depend on an interface or abstract class.
  • Instead of a service calling another service directly, it may use APIs, message queues, or dependency injection.
  • Instead of hardcoding configurations, the system may use external configuration files or environment variables.

Benefits of Loose Coupling

Loose coupling provides several advantages to software systems:

  1. Flexibility – You can easily replace or update one component without breaking others.
  2. Reusability – Independent components can be reused in other projects or contexts.
  3. Maintainability – Code is easier to read, modify, and test because components are isolated.
  4. Scalability – Loosely coupled systems are easier to scale since you can distribute or upgrade components independently.
  5. Testability – With fewer dependencies, you can test components in isolation using mocks or stubs.
  6. Resilience – Failures in one module are less likely to cause cascading failures in the entire system.

How to Achieve Loose Coupling

Here are some strategies to achieve loose coupling in software systems:

  1. Use Interfaces and Abstractions
    Depend on interfaces rather than concrete implementations. This allows you to switch implementations without changing the dependent code.
  2. Apply Dependency Injection
    Instead of creating dependencies inside a class, inject them from the outside. This removes hardcoded connections.
  3. Follow Design Patterns
    Patterns such as Strategy, Observer, Factory, and Adapter promote loose coupling by separating concerns and reducing direct dependencies.
  4. Use Message Brokers or APIs
    Instead of direct calls between services, use message queues (like Kafka or RabbitMQ) or REST/GraphQL APIs to communicate.
  5. Externalize Configurations
    Keep system configurations outside the codebase to avoid hard dependencies.
  6. Modularize Your Codebase
    Break your system into small, independent modules that interact through clear contracts.

When and Why Should We Use Loose Coupling?

Loose coupling should be applied whenever you are building systems that need to be flexible, maintainable, and scalable.

  • When building microservices – Each service should be independent and loosely coupled with others through APIs or messaging.
  • When building large enterprise applications – Loose coupling helps reduce complexity and makes maintenance easier.
  • When working in agile environments – Teams can work on separate components independently, with minimal conflicts.
  • When integrating third-party systems – Using abstractions helps replace or upgrade external services without changing the whole codebase.

Without loose coupling, systems quickly become brittle. A small change in one part could cause a chain reaction of errors throughout the system.

Real World Examples

  1. Payment Systems
    In an e-commerce platform, the checkout system should not depend on the details of a specific payment gateway. Instead, it should depend on a payment interface. This allows swapping PayPal, Stripe, or any other provider without major code changes.
  2. Logging Frameworks
    Instead of directly using System.out.println in Java, applications use logging libraries like SLF4J. The application depends on the SLF4J interface, while the actual implementation (Logback, Log4j, etc.) can be switched easily.
  3. Microservices Architecture
    In Netflix’s architecture, microservices communicate using APIs and messaging systems. Each microservice can be developed, deployed, and scaled independently.
  4. Database Access
    Using ORM tools like Hibernate allows developers to work with an abstract data model. If the underlying database changes from MySQL to PostgreSQL, minimal code changes are needed.

How Can We Use Loose Coupling in Our Software Development Process?

To integrate loose coupling into your process:

  1. Start with Good Architecture – Apply principles like SOLID, Clean Architecture, or Hexagonal Architecture.
  2. Emphasize Abstraction – Always code to an interface, not an implementation.
  3. Adopt Dependency Injection Frameworks – Use frameworks like Spring (Java), Angular (TypeScript), or .NET Core’s built-in DI.
  4. Write Modular Code – Divide your system into independent modules with clear boundaries.
  5. Encourage Team Autonomy – Different teams can own different modules if the system is loosely coupled.
  6. Review for Tight Coupling – During code reviews, check for hard dependencies and suggest abstractions.

By adopting loose coupling in your development process, you create systems that are future-proof, resilient, and easier to maintain, ensuring long-term success.

Understanding Dependency Injection in Software Development

Understanding Dependency Injection

What is Dependency Injection?

Dependency Injection (DI) is a design pattern in software engineering where the dependencies of a class or module are provided from the outside, rather than being created internally. In simpler terms, instead of a class creating the objects it needs, those objects are “injected” into it. This approach decouples components, making them more flexible, testable, and maintainable.

For example, instead of a class instantiating a database connection itself, the connection object is passed to it. This allows the class to work with different types of databases without changing its internal logic.

A Brief History of Dependency Injection

The concept of Dependency Injection has its roots in the Inversion of Control (IoC) principle, which was popularized in the late 1990s and early 2000s. Martin Fowler formally introduced the term “Dependency Injection” in 2004, describing it as a way to implement IoC. Frameworks like Spring (Java) and later .NET Core made DI a first-class citizen in modern software development, encouraging developers to separate concerns and write loosely coupled code.

Main Components of Dependency Injection

Dependency Injection typically involves the following components:

  • Service (Dependency): The object that provides functionality (e.g., a database service, logging service).
  • Client (Dependent Class): The object that depends on the service to function.
  • Injector (Framework or Code): The mechanism responsible for providing the service to the client.

For example, in Java Spring:

  • The database service is the dependency.
  • The repository class is the client.
  • The Spring container is the injector that wires them together.

Why is Dependency Injection Important?

DI plays a crucial role in writing clean and maintainable code because:

  • It decouples the creation of objects from their usage.
  • It makes code more adaptable to change.
  • It enables easier testing by allowing dependencies to be replaced with mocks or stubs.
  • It reduces the “hardcoding” of configurations and promotes flexibility.

Benefits of Dependency Injection

  1. Loose Coupling: Clients are independent of specific implementations.
  2. Improved Testability: You can easily inject mock dependencies for unit testing.
  3. Reusability: Components can be reused in different contexts.
  4. Flexibility: Swap implementations without modifying the client.
  5. Cleaner Code: Reduces boilerplate code and centralizes dependency management.

When and How Should We Use Dependency Injection?

  • When to Use:
    • In applications that require flexibility and maintainability.
    • When components need to be tested in isolation.
    • In large systems where dependency management becomes complex.
  • How to Use:
    • Use frameworks like Spring (Java), Guice (Java), Dagger (Android), or ASP.NET Core built-in DI.
    • Apply DI principles when designing classes—focus on interfaces rather than concrete implementations.
    • Configure injectors (containers) to manage dependencies automatically.

Real World Examples of Dependency Injection

Spring Framework (Java):
A service class can be injected into a controller without explicitly creating an instance.

    @Service
    public class UserService {
        public String getUser() {
            return "Emre";
        }
    }
    
    @RestController
    public class UserController {
        private final UserService userService;
    
        @Autowired
        public UserController(UserService userService) {
            this.userService = userService;
        }
    
        @GetMapping("/user")
        public String getUser() {
            return userService.getUser();
        }
    }


    Conclusion

    Dependency Injection is more than just a pattern—it’s a fundamental approach to building flexible, testable, and maintainable software. By externalizing the responsibility of managing dependencies, developers can focus on writing cleaner code that adapts easily to change. Whether you’re building a small application or a large enterprise system, DI can simplify your architecture and improve long-term productivity.

    Understanding the YAGNI Principle in Software Development

    Understanding YAGNI principle

    In software engineering, simplicity and focus are two of the most important values for building sustainable systems. One of the principles that embodies this mindset is YAGNI. Let’s dive deep into what it is, why it matters, and how you can apply it effectively in your projects.

    What is the YAGNI Principle?

    YAGNI stands for “You Aren’t Gonna Need It”.
    It is a principle from Extreme Programming (XP) that reminds developers not to implement functionality until it is absolutely necessary.

    In other words, don’t build features, classes, methods, or infrastructure just in case they might be useful in the future. Instead, focus on what is required right now.

    How Do You Apply YAGNI?

    Applying YAGNI in practice requires discipline and clear communication within the development team. Here are key ways to apply it:

    • Implement only what is needed today: Build features to meet current requirements, not hypothetical future ones.
    • Rely on requirements, not assumptions: Only code against documented and confirmed user stories.
    • Refactor instead of overdesigning: When new requirements emerge, refactor your existing system instead of building speculative features in advance.
    • Keep feedback loops short: Use Agile methods like iterative sprints and regular demos to ensure you’re only building what’s needed.

    Benefits of the YAGNI Principle

    1. Reduced Complexity
      By avoiding unnecessary code, your system remains easier to understand, maintain, and test.
    2. Lower Development Costs
      Every line of code written has a cost. YAGNI prevents waste by ensuring developers don’t spend time on features that might never be used.
    3. Improved Focus
      Developers can concentrate on solving the real problems instead of theoretical ones.
    4. Flexibility and Adaptability
      Since you’re not tied down to speculative designs, your software can evolve naturally as real requirements change.

    Key Considerations When Using YAGNI

    • Balance with Future-Proofing: While YAGNI warns against overengineering, you still need good architecture and coding standards that allow future changes to be integrated smoothly.
    • Avoid “Shortcut” Thinking: YAGNI doesn’t mean ignoring best practices like clean code, tests, or proper design patterns. It only discourages unnecessary features.
    • Understand the Context: In some industries (e.g., healthcare, finance), regulatory or compliance requirements may require upfront planning. Use YAGNI carefully in such cases.

    Real-World Examples of YAGNI

    1. Over-Engineering a Login System
      A startup might only need email/password login for their MVP. Adding OAuth integrations with Facebook, Google, and GitHub from day one would waste time if the product hasn’t even validated its user base yet.
    2. Premature Optimization
      Developers sometimes write highly complex caching logic before knowing if performance is actually an issue. With YAGNI, you wait until performance bottlenecks appear before optimizing.
    3. Unused API Endpoints
      Teams sometimes build API endpoints “because we might need them later.” YAGNI says to avoid this—add them only when there is a confirmed use case.

    How Can We Apply YAGNI in Our Software Development Process?

    • Adopt Agile Methodologies: Use Scrum or Kanban to deliver small increments of value based on actual requirements.
    • Prioritize Requirements Clearly: Work with product owners to ensure that only validated, high-value features are included in the backlog.
    • Practice Test-Driven Development (TDD): Write tests for real, existing requirements instead of speculative scenarios.
    • Encourage Code Reviews: Reviewers can identify overengineered code and push back on “just in case” implementations.
    • Refactor Regularly: Accept that your system will change and evolve; keep it lean so changes are manageable.

    Conclusion

    The YAGNI principle is about restraint, focus, and pragmatism in software development. By resisting the temptation to overbuild and sticking to what is truly necessary, you not only save time and resources but also keep your systems cleaner, simpler, and more adaptable for the future.

    When applied with discipline, YAGNI can significantly improve the agility and sustainability of your software development process.

    KISS Principle in Computer Science

    What is KISS principle?

    What is the KISS Principle?

    The KISS principle stands for “Keep It Simple, Stupid”, a design philosophy that emphasizes simplicity in systems, software, and problem-solving. Originally coined in the 1960s by the U.S. Navy, the principle highlights that most systems work best when they are kept simple rather than made unnecessarily complex.

    In computer science, KISS means writing code, designing architectures, and creating solutions that are straightforward, easy to understand, and easy to maintain. Simplicity reduces the likelihood of errors, speeds up development, and ensures long-term scalability.

    How Do You Apply the KISS Principle?

    Applying KISS requires conscious effort to avoid over-engineering or introducing complexity that is not needed. Some ways to apply it include:

    • Write readable code: Use clear naming conventions, simple logic, and avoid clever but confusing shortcuts.
    • Break problems into smaller pieces: Solve problems with modular, self-contained components.
    • Avoid unnecessary abstractions: Don’t add extra layers, classes, or patterns unless they solve a real need.
    • Leverage existing solutions: Use built-in language features or libraries rather than reinventing the wheel.
    • Document simply: Ensure documentation is concise and easy to follow.

    Benefits of the KISS Principle

    Keeping things simple offers multiple advantages:

    1. Maintainability – Simple systems are easier to maintain and update over time.
    2. Readability – Developers can quickly understand the logic without deep onboarding.
    3. Fewer bugs – Simplicity reduces the risk of introducing hidden issues.
    4. Faster development – Less complexity means faster coding, testing, and deployment.
    5. Better collaboration – Teams can work more effectively on systems that are easier to grasp.

    Main Considerations When Using KISS

    While simplicity is powerful, there are important considerations:

    • Balance with functionality: Simplicity should not come at the cost of missing essential features.
    • Avoid oversimplification: Stripping away too much may lead to fragile designs.
    • Think ahead, but not too far: Plan for scalability, but don’t build for problems that don’t exist yet.
    • Consistency matters: Simplicity is most effective when applied consistently across the entire codebase.

    Real-World Examples of KISS

    1. Unix Philosophy – Each tool does one thing well (e.g., grep, ls, cat). Instead of one complex tool, simple utilities are combined for powerful results.
    2. Hello World programs – A minimal program to test environments. It demonstrates clarity without unnecessary detail.
    3. RESTful APIs – Designed with simple, stateless principles that are easier to understand and scale compared to overly complex RPC systems.
    4. Version Control (Git) – Core commands like commit, push, and pull follow simple workflows. Advanced features exist, but the basics are simple and intuitive.

    Applying KISS in Software Development Processes

    Here are practical ways to embed KISS into your workflow:

    • Code reviews: Encourage reviewers to question unnecessary complexity.
    • Agile and iterative development: Build simple versions first (MVPs) and expand only if needed.
    • Design discussions: Ask, “Can this be made simpler?” before finalizing architectures.
    • Testing strategies: Simple unit tests are often more reliable than over-engineered test suites.
    • Refactoring sessions: Regularly revisit old code to simplify it as the system grows.

    Conclusion

    The KISS principle is a timeless guide for software engineers: simplicity is the key to robustness, maintainability, and efficiency. By applying it consistently, teams can build systems that last longer, are easier to maintain, and deliver more value with fewer headaches.

    Blog at WordPress.com.

    Up ↑