Command Query Responsibility Segregation (CQRS) is a software architecture pattern that separates the responsibilities of reading data (queries) and writing data (commands) into two distinct models. Instead of having one unified model for both, CQRS encourages using different pathways optimized for each task.
This separation is especially useful in large, complex systems where read and write operations have very different performance and scalability needs.
A Brief History of CQRS
CQRS was popularized by Greg Young in 2010, but its roots trace back to Bertrand Meyer’s Command Query Separation (CQS) principle in the late 1980s.
CQS stated that a method should either change state (command) or return data (query), but never both.
CQRS extended this principle from methods to entire architectures.
Command Query Separation (CQS) was introduced by Bertrand Meyer in the 1980s with the Eiffel programming language.
Its rule:
Commands modify state but return nothing.
Queries return data but do not modify state.
This principle laid the foundation for CQRS by emphasizing clear separation of responsibilities.
Can use specialized or denormalized data storage for performance.
Message Handling
Commands and queries are typically routed through a mediator or message bus.
This ensures decoupling between the client and the handler logic.
Benefits of CQRS
CQRS offers several benefits:
Scalability: Read and write operations can scale independently.
Flexibility: Different storage models for reads and writes (e.g., SQL for commands, NoSQL for queries).
Performance: Queries can be optimized without impacting the command side.
Clearer Design: Easier to reason about business logic.
Event Support: Works well with event sourcing and audit logging.
Advantages and Disadvantages
Advantages
Improves maintainability and clarity.
Enables independent scaling for reads and writes.
Fits naturally with domain-driven design (DDD) and microservices.
Supports complex event-driven architectures.
Disadvantages
Introduces extra complexity (multiple models, messaging, data sync).
Requires managing eventual consistency between data models.
Higher infrastructure and operational overhead.
When Should We Use CQRS?
CQRS is most valuable when:
The system has complex domains with separate read/write concerns.
Scalability is critical (e.g., thousands of reads per second).
Auditability and event sourcing are required.
You’re building distributed or microservice-based systems.
For small CRUD-based applications, CQRS might be overkill.
Real-World Examples
E-commerce
Commands: placing orders, updating stock.
Queries: browsing product catalogs.
CQRS allows scaling product queries separately from order writes.
Banking
Commands: processing deposits/withdrawals.
Queries: viewing account balances and statements.
Ensures strong consistency on writes while scaling queries.
Social Media
Commands: posting content, likes, comments.
Queries: fetching timelines and feeds.
Heavy read demand benefits from optimized query models.
How CQS Relates to CQRS
CQS is a principle applied at the method level.
CQRS applies the same idea at the system architecture level.
In short, CQRS is a scalable extension of CQS for distributed and complex systems.
Conclusion
CQRS builds on CQS to handle the challenges of modern, large-scale applications. By separating reads and writes, it improves scalability, clarity, and flexibility. However, it comes with added complexity and should be applied thoughtfully.
For e-commerce, banking, social platforms, or microservices, CQRS can provide the maintainability and scalability required for growth.
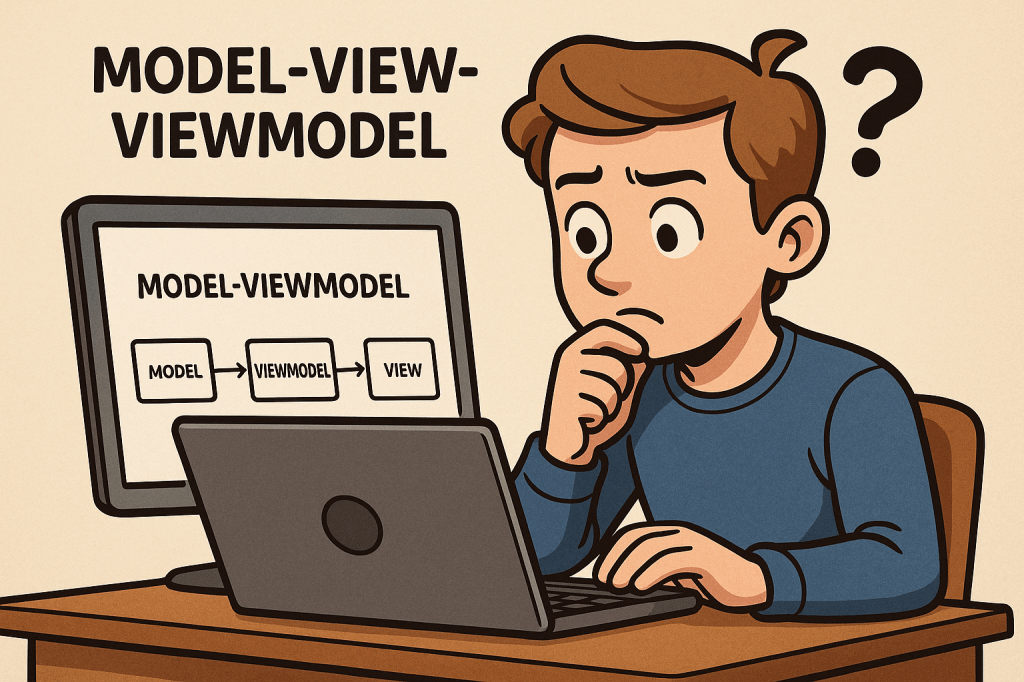
Model-View-ViewModel (MVVM) is a software architectural pattern that helps organize code by separating the user interface (UI) from the business logic. It acts as an evolution of the Model-View-Controller (MVC) pattern, designed to make applications more testable, maintainable, and scalable. MVVM is particularly popular in applications with complex user interfaces, such as desktop and mobile apps.
A Brief History
MVVM was introduced by Microsoft around 2005 as part of the development of Windows Presentation Foundation (WPF). The goal was to provide a clean separation between the UI and underlying application logic, making it easier for designers and developers to collaborate. Over time, the pattern has spread beyond WPF and is now used in many frameworks and platforms, including Xamarin, Angular, and even some JavaScript libraries.
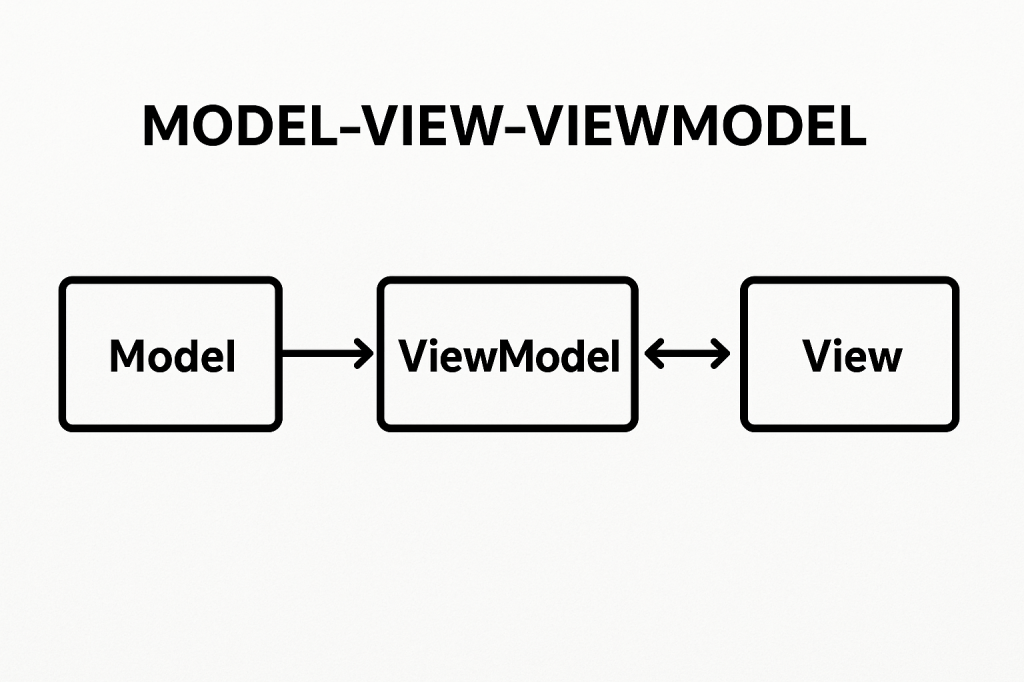
Main Components of MVVM
MVVM is built on three main components:
Model
Represents the data and business logic of the application.
Responsible for managing the application state, retrieving data from databases or APIs, and applying business rules.
Example: A Customer class containing fields like Name, Email, and methods for validation.
View
Represents the user interface.
Displays the data and interacts with the user.
Ideally, the view should contain minimal logic and be as declarative as possible.
Example: A screen layout in WPF, Android XML, or an HTML template.
ViewModel
Acts as a bridge between the Model and the View.
Handles UI logic, state management, and provides data in a format the View can easily consume.
Exposes commands and properties that the View binds to.
Example: A CustomerViewModel exposing properties like FullName or commands like SaveCustomer.
Benefits of MVVM
Separation of Concerns: UI code is decoupled from business logic, making the system more maintainable.
Improved Testability: Since the ViewModel doesn’t depend on UI elements, it can be easily unit tested.
Reusability: The same ViewModel can be used with different Views, increasing flexibility.
Collaboration: Designers can work on Views while developers work on ViewModels independently.
Advantages and Disadvantages
Advantages
Cleaner and more organized code structure.
Reduces duplication of logic across UI components.
Makes it easier to scale applications with complex user interfaces.
Disadvantages
Can introduce complexity for smaller projects where the overhead is unnecessary.
Learning curve for developers new to data binding and command patterns.
Requires careful planning to avoid over-engineering.
When Can We Use MVVM?
MVVM is best suited for:
Applications with complex or dynamic user interfaces.
Projects requiring strong separation of responsibilities.
Teams where designers and developers work closely together.
Applications needing high test coverage for business and UI logic.
Real World Example
Consider a banking application with a dashboard displaying account balances, recent transactions, and quick actions.
Model: Manages account data retrieved from a server.
View: The dashboard screen the user interacts with.
ViewModel: Provides observable properties like Balance, TransactionList, and commands such as TransferMoney.
This allows changes in the Model (like a new transaction) to automatically update the View without direct coupling.
Integrating MVVM into Our Software Development Process
Identify UI Components: Break down your application into Views and determine the data each needs.
Design ViewModels: Create ViewModels to expose the required data and commands.
Implement Models: Build Models that handle business rules and data access.
Apply Data Binding: Bind Views to ViewModels for real-time updates.
Testing: Write unit tests for ViewModels to ensure correctness without relying on the UI.
Iterate: As requirements change, update ViewModels and Models while keeping the View lightweight.
When developing a new product, one of the most effective strategies is to start small, test your ideas, and grow based on real feedback. This approach is called creating a Minimum Viable Product (MVP).
What is a Minimum Viable Product?
A Minimum Viable Product (MVP) is the most basic version of a product that still delivers value to users. It is not a full-fledged product with every feature imagined, but a simplified version that solves the core problem and allows you to test your concept in the real world.
The MVP focuses on answering one important question: Does this product solve a real problem for users?
Key Features of an MVP
Core Functionality Only An MVP should focus on the most essential features that directly address the problem. Extra features can be added later once feedback is collected.
Usability Even though it is minimal, the product must be usable. Users should be able to complete the core task smoothly without confusion.
Scalability Consideration While it starts small, the design should not block future growth. The MVP should be a foundation for future improvements.
Fast to Build The MVP must be developed quickly so that testing and feedback cycles can begin early. Speed is one of its key strengths.
Feedback-Driven The MVP should make it easy to collect feedback from users, whether through analytics, surveys, or usage data.
Purpose of an MVP
The main purpose of an MVP is validation. Before investing large amounts of time and resources, companies want to know if their idea will actually succeed.
It allows testing assumptions with real users.
It helps confirm whether the problem you are solving is truly important.
It prevents wasting resources on features or ideas that don’t matter to customers.
It provides early market entry and brand visibility.
In short, the purpose of an MVP is to reduce risk while maximizing learning.
Benefits of an MVP
Cost Efficiency Instead of spending a large budget on full development, an MVP helps you invest small and learn quickly.
Faster Time to Market You can launch quickly, test your idea, and make improvements while competitors are still planning.
Real User Feedback MVP development lets you learn directly from your audience instead of guessing what they want.
Reduced Risk By validating assumptions early, you avoid investing in products that may not succeed.
Investor Confidence If your MVP shows traction, it becomes easier to attract investors and funding.
Real-World Example of an MVP
One famous example is Dropbox. Before building the full product, Dropbox created a simple video demonstrating how their file-sharing system would work. The video attracted thousands of sign-ups from people who wanted the product, proving the idea had strong demand. Based on this validation, Dropbox built and released the full product, which later became a global success.
How to Use an MVP in Software Development
Identify the Core Problem Focus on the exact problem your software aims to solve.
Select Key Features Only Build only the features necessary to address the core problem.
Develop Quickly Keep development short and simple. The goal is learning, not perfection.
Release to a Small Audience Test with early adopters who are willing to give feedback.
Collect Feedback and Iterate Use customer feedback to improve the product step by step.
Scale Gradually Once validated, add new features and expand your product.
By adopting the MVP approach, software teams can innovate faster, reduce risk, and build products that truly meet customer needs.
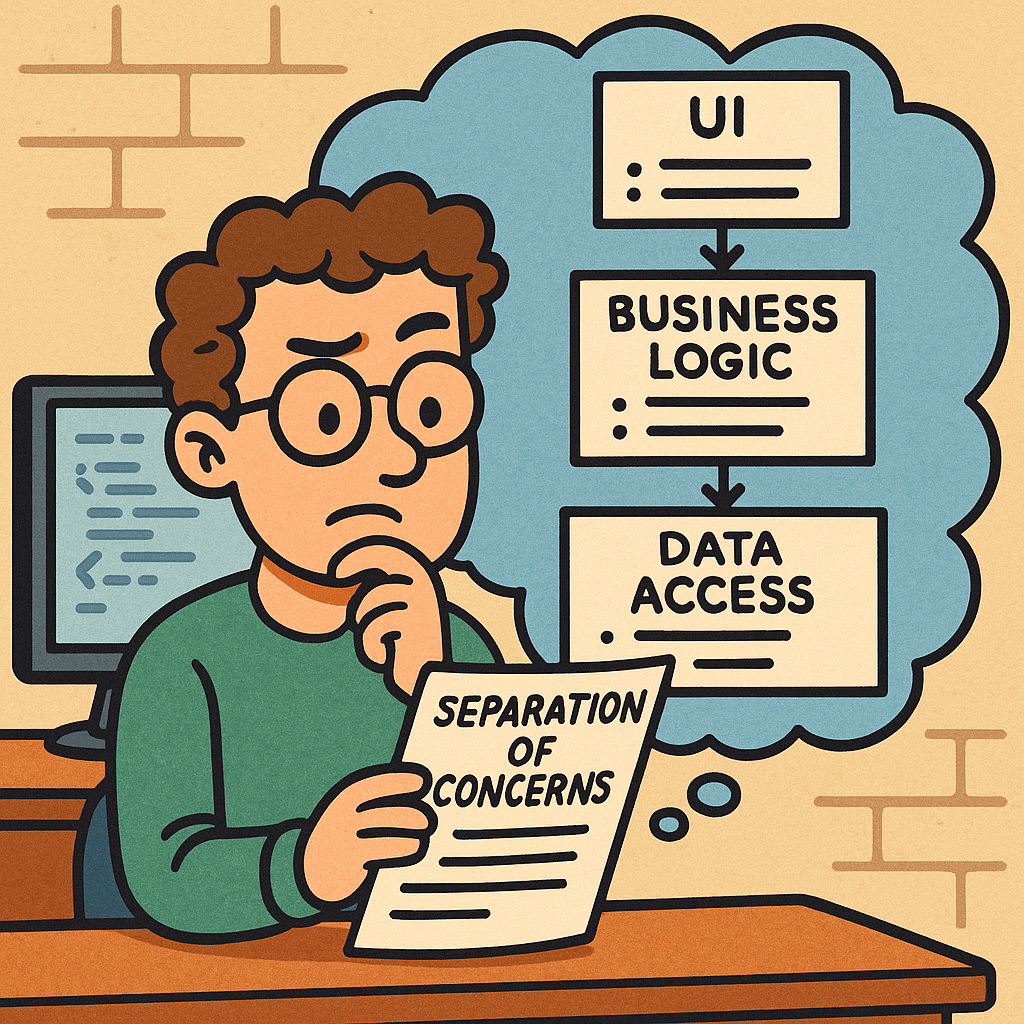
Separation of Concerns (SoC) is a foundational design principle: split your system into parts, where each part focuses on a single, well-defined responsibility. Done well, SoC makes code easier to understand, test, change, scale, and secure.
What is Separation of Concerns?
SoC means organizing software so that each module addresses one concern (a responsibility or “reason to change”) and hides the details of that concern behind clear interfaces.
Concern = a cohesive responsibility: UI rendering, data access, domain rules, logging, authentication, caching, configuration, etc.
Separation = boundaries (files, classes, packages, services) that prevent concerns from leaking into each other.
Related but different concepts
Single Responsibility Principle (SRP): applies at the class/function level. SoC applies at system/module scale.
Modularity: a property of structure; SoC is the guiding principle that tells you how to modularize.
Encapsulation: the technique that makes separation effective (hide internals, expose minimal interfaces).
How SoC Works
Identify Axes of Change Ask: If this changes, what else would need to change? Group code so that each axis of change is isolated (e.g., UI design changes vs. database vendor changes vs. business rules changes).
Define Explicit Boundaries
Use layers (Presentation → Application/Service → Domain → Infrastructure/DB).
Or vertical slices (Feature A, Feature B), each containing its own UI, logic, and data adapters.
Or services (Auth, Catalog, Orders) with network boundaries.
Establish Contracts
Interfaces/DTOs so layers talk in clear, stable shapes.
APIs so services communicate without sharing internals.
Events so features integrate without tight coupling.
Enforce Directional Dependencies
High-level policy (domain rules) should not depend on low-level details (database, frameworks).
In code, point dependencies inward to abstractions (ports), and keep details behind adapters.
Extract Cross-Cutting Concerns
Logging, metrics, auth, validation, caching → implement via middleware, decorators, AOP, or interceptors, not scattered everywhere.
Automate Guardrails
Lint rules and architecture tests (e.g., “controllers must not import repositories directly”).
Package visibility (e.g., Java package-private), access modifiers, and module boundaries.
Benefits of SoC
Change isolation: Modify one concern without ripple effects (e.g., swap PostgreSQL for MySQL by changing only the DB adapter).
Testability: Unit tests target a single concern; integration tests verify boundaries; fewer mocks in the wrong places.
Reusability: A cleanly separated module (e.g., a pricing engine) can be reused in multiple apps.
Parallel development: Teams own concerns or slices without stepping on each other.
Scalability & performance: Scale just the hot path (e.g., cache layer or read model) instead of the whole system.
God objects/modules: a “Utils” that handles everything.
Fix: split by concern; create dedicated packages.
Quick Checklist
Does each module have one primary reason to change?
Are dependencies pointing inward toward abstractions?
Are cross-cutting concerns centralized?
Can I swap an implementation (DB, API, style) by touching one area?
Do tests cover each concern in isolation?
Are there docs/diagrams showing boundaries and contracts?
How to Start Using SoC This Week
Create a dependency graph of your project (most IDEs or linters can help).
Pick one hot spot (e.g., payment, auth, reporting) and extract its interfaces/adapters.
Introduce a middleware layer for logging/validation/auth.
Write one architecture test that forbids controllers from importing repositories.
Document one boundary with a simple diagram and ownership.
FAQ
Is SoC the same as microservices? No. Microservices are one way to enforce separation at runtime. You can achieve strong SoC inside a monolith.
How small should a concern be? A concern should map to a cohesive responsibility and an axis of change. If changes to it often require touching multiple modules, your boundary is probably wrong.
Is duplication ever okay? Yes, small local duplication can be cheaper than a shared module that couples unrelated features. Optimize for change cost, not just DRY.
Final Thoughts
Separation of Concerns is about clarity and change-friendliness. Start by identifying responsibilities, draw clean boundaries, enforce them with code and tests, and evolve your structure as the product grows. Your future self (and your teammates) will thank you.
A code review is the process of systematically examining source code written by a developer to identify mistakes, improve quality, and ensure adherence to coding standards. It is a peer-based activity where one or more team members review the code before it is merged into the main codebase.
History of Code Review
The concept of code review dates back to the early days of software engineering in the 1970s, when formal inspections were introduced by Michael Fagan at IBM. These inspections were strict, document-driven, and involved structured meetings. Over time, the practice evolved into more lightweight and flexible processes, especially with the rise of Agile and open-source development, where code review became a standard part of daily workflows.
Importance of Code Review
Code reviews are critical in modern software development. They:
Improve code quality and maintainability
Detect bugs early in the development cycle
Facilitate knowledge sharing among developers
Encourage collaboration and collective ownership of the code
Enforce coding standards and best practices
Components of a Code Review
A successful code review process usually involves:
Author: The developer who wrote the code.
Reviewers: Team members who evaluate the code.
Tools: Platforms such as GitHub, GitLab, Bitbucket, or specialized review tools.
Guidelines: Coding standards, project-specific conventions, and review checklists.
Feedback: Constructive comments, suggestions, and clarifications.
How to Perform a Code Review
Start by understanding the purpose of the code changes.
Review smaller code changes instead of very large pull requests.
Check for correctness, readability, performance, and security.
Ensure the code follows style guides and project conventions.
Provide clear, respectful, and actionable feedback.
Encourage discussion instead of one-sided judgment.
Is There a Formal Process?
Yes, organizations often define formal processes for code reviews. A typical process may include:
Developer submits code changes (pull request or merge request).
Automated tests and linters run first.
One or more reviewers analyze the code and leave comments.
The author addresses feedback and makes changes.
Reviewers approve the changes.
Code is merged into the main branch.
Some teams also use pair programming or walkthroughs as part of the process.
Important Details to Pay Attention To
Reviewers should pay attention to:
Logic and correctness of the code
Security vulnerabilities
Performance implications
Readability and maintainability
Compliance with coding standards
Proper documentation and comments
While it’s important to catch issues, reviewers should avoid nitpicking too much on trivial details unless they affect the project long-term.
How Much Time Should We Spend?
Research suggests that effective code reviews should be 30 to 60 minutes per session, focusing on chunks of code not exceeding 400 lines at a time. Longer reviews often reduce effectiveness due to reviewer fatigue. The key is consistency—review regularly, not occasionally.
Applying Code Review in Current Projects
To integrate code reviews into your development process:
Use pull requests as the entry point for reviews.
Automate tests to catch basic issues before review.
Define clear review guidelines for your team.
Encourage collaborative discussions.
Use tools like GitHub, GitLab, or Bitbucket that integrate seamlessly with workflows.
StringBuilder/StringBuffer: builder-style APIs (append, insert, delete, reverse, setCharAt), then toString()
How Do I Choose?
Quick Decision Guide
Need a constant or rarely change the text? Use String.
Building text in a loop or via many appends in one thread? Use StringBuilder.
Building text shared across threads without external locks? Use StringBuffer (or prefer StringBuilder with your own synchronization strategy if you control access).
Rule of Thumb
Use String by default for readability and safety.
Switch to StringBuilder when performance matters during repeated concatenations.
Use StringBuffer only when you truly need shared mutation across threads.
Practical Examples
Example 1: Costly Loop with String
String s = "";
for (int i = 0; i < 10000; i++) {
    s += i; // creates many temporary objects → avoid
}
Example 2: Efficient Loop with StringBuilder
StringBuilder sb = new StringBuilder(10000); // optional capacity hint
for (int i = 0; i < 10000; i++) {
    sb.append(i);
}
String s = sb.toString();
Example 3: When StringBuffer Makes Sense
// Only if 'shared' is truly accessed by multiple threads concurrently.
StringBuffer shared = new StringBuffer();
Runnable task = () -> {
    for (int i = 0; i < 1000; i++) {
        shared.append(i).append(",");
    }
};
Benefits of Each
String
Simplicity and clarity
Inherent thread safety via immutability
Works well with string pooling (memory optimization)
Safe as map keys and for caching
StringBuilder
Best performance for intensive concatenation
Low GC pressure versus many temporary Strings
Fluent, builder-style API
StringBuffer
Built-in thread safety without external locks
Drop-in API similarity to StringBuilder
When to Use Them (and When Not To)
Use String When
Defining constants and literals
Passing values across layers/APIs
Storing keys in collections (immutability prevents surprises)
Avoid String When
You’re repeatedly concatenating in loops (prefer StringBuilder)
Use StringBuilder When
Building JSON, CSV, logs, or messages in loops
Formatting output dynamically in a single thread
Avoid StringBuilder When
The builder is accessed by multiple threads simultaneously (unless you guard it externally)
Use StringBuffer When
Multiple threads must mutate the same buffer at the same time and you can’t refactor for confinement
Avoid StringBuffer When
You’re single-threaded or can confine builders per thread (prefer StringBuilder for speed)
Additional Tips
About the + Operator
In a single expression, the compiler typically uses an internal StringBuilder.
In loops, += often creates many intermediate objects. Prefer an explicit StringBuilder.
Capacity Planning
Builders start with a default capacity and grow (usually doubling plus a small constant).
If you can estimate size, call new StringBuilder(expectedLength) or ensureCapacity to reduce reallocations.
Interoperability
Convert builders to String with toString().
For equality checks, compare String values, not builders.
Summary
String: Immutable, simple, safe → use by default for stable text.
StringBuilder: Mutable, fastest for repeated concatenations in one thread.
StringBuffer: Mutable, synchronized for shared multi-threaded mutation—use only when you truly need it.
With these guidelines, choose the simplest type that meets your thread-safety and performance needs, and only optimize to builders when profiling or repeated concatenation calls for it.
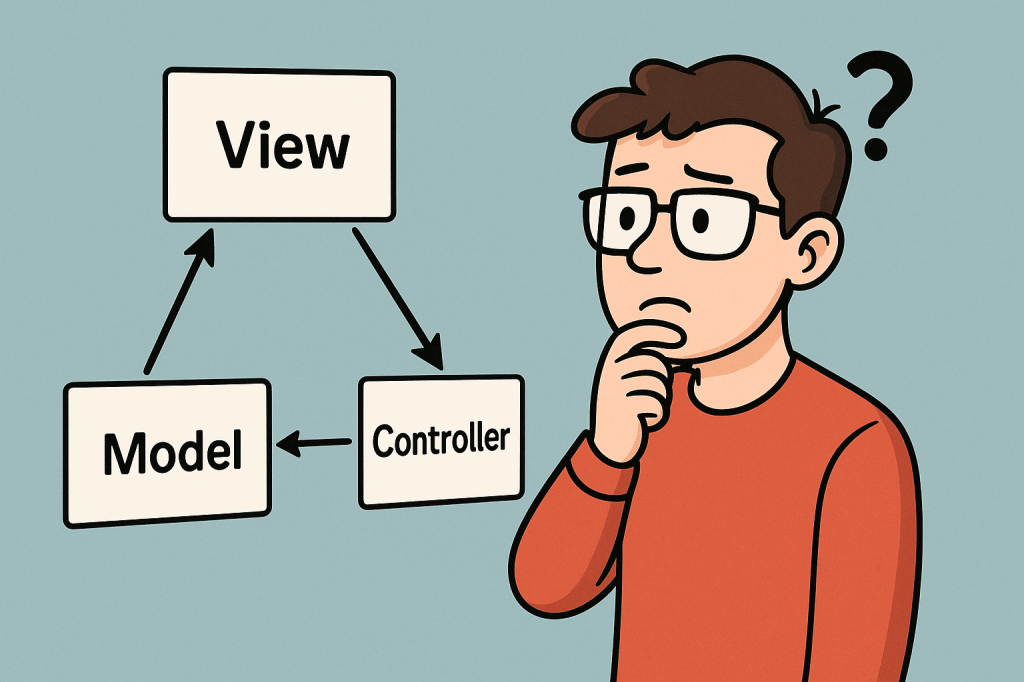
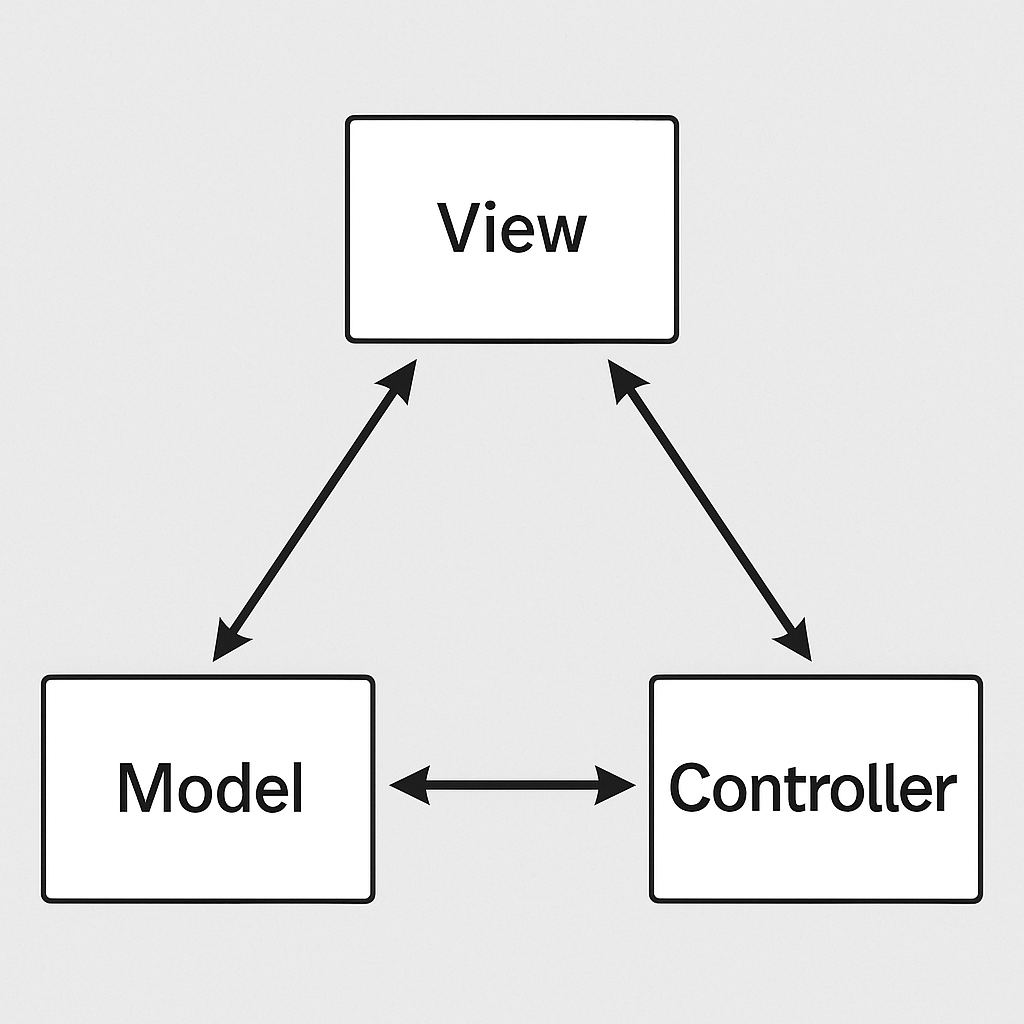
MVC stands for Model–View–Controller, a popular architectural pattern used in software engineering. An MVC framework provides a structured way to separate concerns in an application, making development, testing, and maintenance more manageable. Instead of mixing data, logic, and presentation in one place, MVC enforces a separation that leads to cleaner and more scalable applications.
A Brief History of MVC
The concept of MVC was introduced in the late 1970s by Trygve Reenskaug while working on Smalltalk at Xerox PARC. It was designed as a way to build graphical user interfaces (GUIs) where data and display could be managed independently. Over the years, MVC gained traction in desktop applications and later became one of the dominant architectural patterns for web development frameworks like Ruby on Rails, Django, Angular (early versions), and ASP.NET MVC.
Principles and Components of MVC
The MVC pattern is based on the principle of separation of concerns, ensuring that each part of the application has a distinct role. It consists of three main components:
1. Model
Represents the data and the business logic of the application.
It is responsible for retrieving, storing, and updating information (often interacting with a database).
Example: In a blog system, the Post model defines the structure of a blog post and manages operations like saving or fetching posts.
2. View
Handles the presentation layer.
Responsible for displaying the data from the model in a user-friendly way (HTML, JSON, templates, etc.).
Example: A web page showing a list of blog posts retrieved by the model.
3. Controller
Acts as the middle layer between the Model and View.
Receives input from the user, processes it, communicates with the model, and selects the appropriate view for the response.
Example: When a user clicks “Create Post,” the controller processes the request, updates the model, and sends the user to a confirmation view.
Advantages of MVC Frameworks
Separation of concerns: Each component handles a specific responsibility, reducing code complexity.
Maintainability: Easier to update or modify individual parts without affecting the entire system.
Testability: Each component can be tested independently, leading to more reliable applications.
Reusability: Models, views, or controllers can be reused across different parts of the application.
Collaboration: Teams can work on different parts (UI, backend, logic) simultaneously without conflicts.
Benefits for Today’s Software Development
In today’s world of fast-paced, large-scale software development, MVC frameworks provide a foundation for:
Scalability: Applications can grow in features and users while remaining stable.
Agility: Easier to adopt Agile and DevOps practices, since MVC frameworks often integrate well with CI/CD pipelines.
Cross-platform use: MVC works for both web and mobile applications, making it versatile.
Community and support: Many popular frameworks (Spring MVC, Laravel, Rails, Django) are built on MVC principles, offering strong ecosystems and libraries.
Why Do People Prefer to Use MVC?
Familiarity: MVC is widely taught and used, so developers are comfortable with it.
Productivity: Built-in structures and conventions reduce the need to “reinvent the wheel.”
Efficiency: Development is faster because teams can work in parallel on models, views, and controllers.
Integration: Works well with modern tools, cloud services, and databases.
How to Integrate MVC into Your Software Development Process
Choose a framework: Pick one suited to your programming language (e.g., Spring MVC for Java, Laravel for PHP, Django for Python).
Define models: Identify your application’s data structures and business rules.
Design views: Create templates or interfaces to present data clearly to users.
Implement controllers: Connect user actions to business logic and select views for responses.
Test each layer: Write unit tests for models, functional tests for controllers, and UI tests for views.
Iterate and refine: Continuously improve your architecture as your project grows.
The Waterfall Model is one of the earliest and most traditional approaches to software development. It follows a linear and sequential design process, where each phase must be completed before moving on to the next. Much like water flowing down a series of steps, the process moves forward without going back.
A Brief History of the Waterfall Model
The concept of the Waterfall Model was first introduced in 1970 by Dr. Winston W. Royce in his paper “Managing the Development of Large Software Systems”. While Royce actually presented it as an example of a flawed model (because of its rigidity), the structure was later adapted and formalized. Since then, it became widely used in the 1970s and 1980s, especially for large government and defense projects, where strict documentation and approvals were necessary.
Principles of the Waterfall Model
The Waterfall Model is based on a few guiding principles that define its step-by-step structure:
Sequential Progression Development flows in one direction — from requirements to design, implementation, testing, deployment, and maintenance.
Phase Dependency Each phase must be fully completed before moving to the next. No overlapping or revisiting of previous phases is expected.
Documentation Driven Every stage produces detailed documentation, ensuring clarity and consistency throughout the project lifecycle.
Predictability and Control With well-defined phases and deliverables, project timelines and costs can be estimated more accurately.
Customer Sign-off at Each Stage Stakeholders approve requirements and designs at early stages, reducing the chances of late surprises.
Why Should We Use the Waterfall Model?
The Waterfall Model provides a clear structure and is easy to understand. It is especially useful for teams that need:
A predictable and straightforward process.
Detailed documentation and traceability.
Strict compliance with external regulations.
Advantages of the Waterfall Model
Simple and easy to manage.
Well-defined stages with clear milestones.
Detailed documentation helps with knowledge transfer.
Suitable for projects with stable and well-understood requirements.
Easier to measure progress against the plan.
Disadvantages of the Waterfall Model
Very rigid and inflexible.
Difficult to adapt to changing requirements.
Testing comes late in the process, which may delay bug detection.
Not ideal for projects with high uncertainty or evolving needs.
Can lead to wasted effort if requirements change after early stages.
When Should We Use the Waterfall Model?
The Waterfall Model is best suited for:
Projects with clear, fixed requirements that are unlikely to change.
Systems requiring strict compliance, such as healthcare, defense, or government projects.
Projects where documentation and approvals are critical.
Smaller projects where the scope is well understood from the start.
It is less suitable for agile environments or modern software systems that require rapid iterations and frequent feedback.
Applying the Waterfall Model in Software Development
To apply the Waterfall Model in your process:
Gather Requirements – Collect all functional and non-functional requirements from stakeholders.
Design the System – Create detailed system and software designs, including architecture and data models.
Implement the Code – Develop the system according to the approved design.
Test the System – Perform unit, integration, and system testing to verify functionality.
Deploy the Product – Deliver the software to the end users.
Maintain the System – Provide updates, bug fixes, and support over time.
By following these phases strictly in sequence, you can ensure a predictable outcome — though at the cost of flexibility.
When working with logic, programming, or digital systems, we often need a way to clearly represent how different conditions lead to specific outcomes. This is where truth tables come in. They provide a simple and structured way to visualize logical relationships.
What is a Truth Table?
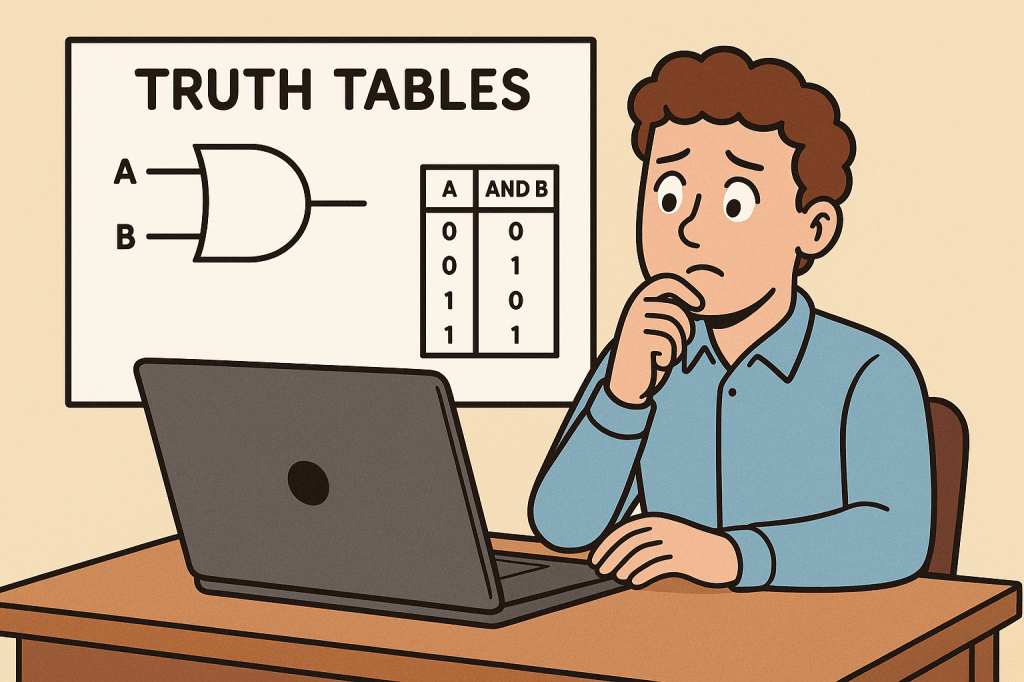
A truth table is a tabular representation of all possible values of logical variables and the results of applying logical operations to them. Each row of the table shows one possible combination of input values and the corresponding output.
For example, in Boolean logic, variables can only take values of true (1) or false (0). A truth table lists all combinations of true and false values and shows the resulting output for a given expression or logic gate.
How Do We Use Truth Tables?
Truth tables are used to:
Evaluate logical expressions step by step.
Verify the correctness of logical statements.
Design digital circuits by showing how inputs affect outputs.
Understand how multiple conditions combine in programming.
By laying everything out in a table, it becomes easier to see the exact behavior of a logical rule.
When Do We Need Truth Tables?
You will typically need a truth table when:
Designing or analyzing digital circuits (AND, OR, NOT, XOR gates, etc.).
Checking logical equivalence between different expressions.
Debugging conditional logic in software programs.
Learning the basics of Boolean algebra in computer science education.
In short, whenever there are multiple conditions that can combine in different ways, a truth table helps make sense of them.
How Do We Create a Truth Table?
Identify the variables: Determine the logical inputs (e.g., A, B).
List all combinations: For two variables, there are 4 combinations; for three, there are 8; in general, for n variables, there are 2^n combinations.
Apply the operation: Write down the output of the logical expression for each row.
Fill the table: Once all rows are complete, the truth table fully represents the logic.
Example for the AND operator with two variables A and B:
A
B
A AND B
0
0
0
0
1
0
1
0
0
1
1
1
Real World Use Cases of Truth Tables
Digital Electronics: Truth tables define the behavior of circuits used in computers, calculators, and smartphones.
Programming: When combining multiple conditions in an if statement, truth tables help ensure correctness.
Database Queries: Logical conditions like WHERE A AND B or WHERE A OR B can be validated using truth tables.
Artificial Intelligence: Rule-based expert systems use truth tables to represent decisions.
Mathematics & Logic: Used to prove logical equivalences and theorems.
Conclusion
Truth tables may seem simple, but they form the foundation of logical reasoning in computer science. Whether you’re writing a program, learning Boolean algebra, or designing digital circuits, understanding truth tables is essential. By systematically showing every possible combination of inputs and outputs, truth tables make complex logic easier to understand, verify, and apply in the real world.


Recent Comments